<?xml version="1.0" encoding="utf-8"?><feed xmlns="http://www.w3.org/2005/Atom" xml:lang="en"><generator uri="https://jekyllrb.com/" version="3.10.0">Jekyll</generator><link href="https://krjakbrjak.github.io/feed.xml" rel="self" type="application/atom+xml" /><link href="https://krjakbrjak.github.io/" rel="alternate" type="text/html" hreflang="en" /><updated>2026-06-13T19:48:59+00:00</updated><id>https://krjakbrjak.github.io/feed.xml</id><title type="html">krjakbrjak’s Dev Notes</title><subtitle>A collection of development notes, tutorials, and insights. Sharing knowledge on software engineering, coding best practices, and personal projects.</subtitle><author><name>Nikita Vakula</name></author><entry><title type="html">Bootstrapping Kubernetes Before the Registry Exists - Pre-Tagging Images for containerd</title><link href="https://krjakbrjak.github.io/devops/kubernetes/2026/05/31/Bootstrapping-Kubernetes-Before-the-Registry-Exists-Pre-Tagging-Images-for-containerd.html" rel="alternate" type="text/html" title="Bootstrapping Kubernetes Before the Registry Exists - Pre-Tagging Images for containerd" /><published>2026-05-31T00:00:00+00:00</published><updated>2026-05-31T00:00:00+00:00</updated><id>https://krjakbrjak.github.io/devops/kubernetes/2026/05/31/Bootstrapping%20Kubernetes%20Before%20the%20Registry%20Exists%20-%20Pre-Tagging%20Images%20for%20containerd</id><content type="html" xml:base="https://krjakbrjak.github.io/devops/kubernetes/2026/05/31/Bootstrapping-Kubernetes-Before-the-Registry-Exists-Pre-Tagging-Images-for-containerd.html"><![CDATA[<p>If you’re setting up Kubernetes for a private project — internal tools, an isolated network, an in-house stack — at some point you hit the question: where do the images come from?</p>

<p>Every tutorial assumes public registries like <code class="language-plaintext highlighter-rouge">docker.io</code>, <code class="language-plaintext highlighter-rouge">ghcr.io</code>, or <code class="language-plaintext highlighter-rouge">quay.io</code> are reachable. When they aren’t, the chicken-and-egg starts. You can’t pull your registry image from your registry. You can’t authenticate against your IdP before the IdP is up. Each foundation service has the same shape.</p>

<p>There isn’t much written about how to actually bootstrap from this state. Here’s the approach I’ve been using.</p>

<h2 id="foundation-services-all-have-the-same-problem">Foundation services all have the same problem</h2>

<p>The same pattern shows up everywhere:</p>

<ul>
  <li><strong>Registry</strong>: kubelet needs to pull the registry image from somewhere, but the registry is what would serve it.</li>
  <li><strong>Identity provider</strong>: anything that does OIDC depends on the IdP being up — and the IdP pod doesn’t start without an image pull either.</li>
</ul>

<p>If you treat each one as a special case, you end up with a pile of “first time only” scripts that drift out of sync with your normal deploy path.</p>

<h2 id="a-workable-approach">A workable approach</h2>

<p>The mechanic itself is plain:</p>

<ol>
  <li>Build the image with <code class="language-plaintext highlighter-rouge">docker build</code>.</li>
  <li>Save it to a tarball with <code class="language-plaintext highlighter-rouge">docker save</code>.</li>
  <li>Copy the tarball to every Kubernetes node.</li>
  <li>Import it into containerd with <code class="language-plaintext highlighter-rouge">ctr -n k8s.io images import &lt;tar&gt;</code>.</li>
</ol>

<p>With <code class="language-plaintext highlighter-rouge">imagePullPolicy: IfNotPresent</code> set on the pod spec, kubelet uses the cached image and doesn’t try to pull. The registry doesn’t have to be up. Nothing has to be reachable.</p>

<p>None of these steps are exotic. What matters is step 2 — specifically, which name you tag the image with before saving.</p>

<h2 id="the-naming-has-to-line-up">The naming has to line up</h2>

<p>When you import an image into containerd, it ends up in the cache under whatever name the tarball says. That name is just a string. There’s nothing special about <code class="language-plaintext highlighter-rouge">repo/registry:latest</code> vs <code class="language-plaintext highlighter-rouge">registry.example.com/repo/registry:latest</code> — both are valid, either can live in the cache, neither requires the registry hostname to resolve.</p>

<p>So the question is: which name?</p>

<p>The easy answer is the bare name that matches the chart defaults:</p>

<div class="language-yaml highlighter-rouge"><div class="highlight"><pre class="highlight"><code><span class="c1"># values.yaml</span>
<span class="na">image</span><span class="pi">:</span>
  <span class="na">repository</span><span class="pi">:</span> <span class="s">repo/registry</span>
  <span class="na">tag</span><span class="pi">:</span> <span class="s">latest</span>
  <span class="na">pullPolicy</span><span class="pi">:</span> <span class="s">IfNotPresent</span>
</code></pre></div></div>

<div class="language-bash highlighter-rouge"><div class="highlight"><pre class="highlight"><code>docker build <span class="nt">-t</span> repo/registry:latest <span class="nb">.</span>
docker save repo/registry:latest <span class="o">&gt;</span> registry.tar
scp registry.tar node:/tmp/
ssh node <span class="s1">'sudo ctr -n k8s.io images import /tmp/registry.tar'</span>
</code></pre></div></div>

<p>It works on day 1. But once the registry is up and you start pushing real builds like <code class="language-plaintext highlighter-rouge">registry.example.com/repo/registry:v0.4.2</code>, every chart needs its <code class="language-plaintext highlighter-rouge">image.repository</code> flipped to the fully-qualified path. Multiple charts, multiple environments, multiple overlays. Day-1 and day-2 deploys end up as different code paths.</p>

<p>The fix is to make the name you import under match the name your chart references and the name kubelet would dial out for. Three things, one string. Use the fully-qualified registry path from day 1:</p>

<div class="language-bash highlighter-rouge"><div class="highlight"><pre class="highlight"><code>docker build <span class="nt">-t</span> registry.example.com/repo/registry:v0.4.2 <span class="nb">.</span>
docker save registry.example.com/repo/registry:v0.4.2 <span class="o">&gt;</span> registry.tar
scp registry.tar node:/tmp/
ssh node <span class="s1">'sudo ctr -n k8s.io images import /tmp/registry.tar'</span>
</code></pre></div></div>

<div class="language-yaml highlighter-rouge"><div class="highlight"><pre class="highlight"><code><span class="na">image</span><span class="pi">:</span>
  <span class="na">repository</span><span class="pi">:</span> <span class="s">registry.example.com/repo/registry</span>
  <span class="na">tag</span><span class="pi">:</span> <span class="s">v0.4.2</span>
  <span class="na">pullPolicy</span><span class="pi">:</span> <span class="s">IfNotPresent</span>
</code></pre></div></div>

<p>Now containerd’s cache key, the chart’s <code class="language-plaintext highlighter-rouge">image.repository</code>, and the hostname kubelet would query on a cache miss are all the same string. The cluster can’t tell whether the image came from a side-load yesterday or a registry pull this morning.</p>

<blockquote>
  <p><strong>One caveat about the tag itself</strong>: use an immutable tag like <code class="language-plaintext highlighter-rouge">v0.4.2</code>, not <code class="language-plaintext highlighter-rouge">latest</code>. With <code class="language-plaintext highlighter-rouge">IfNotPresent</code>, kubelet keeps any image already in the cache and never re-pulls it — so a side-loaded <code class="language-plaintext highlighter-rouge">latest</code> stays frozen at the bootstrap build even after the registry is serving a newer <code class="language-plaintext highlighter-rouge">latest</code>. An immutable tag sidesteps this: the bootstrap nodes hold <code class="language-plaintext highlighter-rouge">v0.4.2</code> forever (correctly), and the next release ships as <code class="language-plaintext highlighter-rouge">v0.4.3</code>, which those nodes have never seen and therefore pull normally once the registry is up.</p>
</blockquote>

<h2 id="what-this-gives-you">What this gives you</h2>

<p><strong>Every foundation service bootstraps the same way.</strong> Registry, IdP — same mechanic, same naming pattern, no special cases. The bootstrap script becomes a loop over a list of images.</p>

<p><strong>Helm values are written once.</strong> No bootstrap-mode overlays versus production-mode overlays. No <code class="language-plaintext highlighter-rouge">image.repository</code> migration to track later. The values file you ship is the values file that stays correct.</p>

<p><strong>Argo CD inherits the cluster cleanly.</strong> When you move to GitOps, Argo CD reads the same Helm charts. The image strings are unchanged — the side-loaded tags are already cached, and every new release bumps to a tag the nodes haven’t seen, so kubelet pulls it from the registry normally. No migration, no first-sync mode, no <code class="language-plaintext highlighter-rouge">Application</code> that has to know about the bootstrap path. Day-1 and day-2 are the same code path because the names line up.</p>

<h2 id="conclusion">Conclusion</h2>

<p>The mechanic isn’t the point. <code class="language-plaintext highlighter-rouge">docker save</code> and <code class="language-plaintext highlighter-rouge">ctr import</code> are not clever. What matters is the alignment: the name in containerd, the name in the chart, and the name kubelet would dial out for — all the same string from the first import.</p>

<p>When they line up, the chicken-and-egg stops feeling like a problem.</p>]]></content><author><name>Nikita Vakula</name></author><category term="devops" /><category term="kubernetes" /><category term="devops" /><category term="kubernetes" /><category term="bootstrap" /><category term="helm" /><category term="containerd" /><summary type="html"><![CDATA[Bootstrap a Kubernetes cluster before the private registry exists. Pre-tag side-loaded container images with the future registry path so Helm values, containerd cache, and kubelet pulls all reference the same string.]]></summary></entry><entry><title type="html">When systemd-resolved Picks the Wrong DNS Server</title><link href="https://krjakbrjak.github.io/devops/dns/virtualization/2026/03/17/When-systemd-resolved-Picks-the-Wrong-DNS-Server.html" rel="alternate" type="text/html" title="When systemd-resolved Picks the Wrong DNS Server" /><published>2026-03-17T00:00:00+00:00</published><updated>2026-03-17T00:00:00+00:00</updated><id>https://krjakbrjak.github.io/devops/dns/virtualization/2026/03/17/When%20systemd-resolved%20Picks%20the%20Wrong%20DNS%20Server</id><content type="html" xml:base="https://krjakbrjak.github.io/devops/dns/virtualization/2026/03/17/When-systemd-resolved-Picks-the-Wrong-DNS-Server.html"><![CDATA[<p>In a <a href="/devops/dns/virtualization/2026/01/30/Simple-DNS-forwarder.html">previous post</a>, I described how I built a DNS forwarder for <a href="https://github.com/q-controller/qcontroller">qcontroller</a> — a tool that manages QEMU VM instances. The forwarder watches the host’s <code class="language-plaintext highlighter-rouge">resolv.conf</code> for changes and propagates upstream DNS servers to VMs transparently. It worked great — until I noticed that VMs occasionally failed to resolve private hostnames defined in the host’s <code class="language-plaintext highlighter-rouge">/etc/hosts</code>.</p>

<h2 id="the-symptom">The Symptom</h2>

<p>The setup was straightforward. Inside each VM, DHCP advertised three DNS servers: the gateway IP (pointing to the forwarder) plus <code class="language-plaintext highlighter-rouge">8.8.8.8</code> and <code class="language-plaintext highlighter-rouge">1.1.1.1</code> as fallbacks. From the host, querying the forwarder directly worked fine:</p>

<div class="language-plaintext highlighter-rouge"><div class="highlight"><pre class="highlight"><code>$ dig @192.168.71.1 myserver.internal.corp
;; ANSWER SECTION:
myserver.internal.corp.	0	IN	A	10.0.50.42
</code></pre></div></div>

<p>But from inside a VM:</p>

<div class="language-plaintext highlighter-rouge"><div class="highlight"><pre class="highlight"><code>$ dig myserver.internal.corp
;; -&gt;&gt;HEADER&lt;&lt;- opcode: QUERY, status: NXDOMAIN
;; SERVER: 127.0.0.53#53(127.0.0.53) (UDP)
</code></pre></div></div>

<p>NXDOMAIN. The VM’s systemd-resolved returned a negative answer — even though the forwarder had the correct one. What was going on?</p>

<h2 id="systemd-resolved-treats-all-dns-servers-as-equivalent">systemd-resolved Treats All DNS Servers as Equivalent</h2>

<p>A quick <code class="language-plaintext highlighter-rouge">resolvectl status</code> inside the VM revealed the problem:</p>

<div class="language-plaintext highlighter-rouge"><div class="highlight"><pre class="highlight"><code>Current DNS Server: 1.1.1.1
       DNS Servers: 192.168.71.1 1.1.1.1 8.8.8.8
</code></pre></div></div>

<p>systemd-resolved had picked <code class="language-plaintext highlighter-rouge">1.1.1.1</code> as its active server — not the forwarder. And <code class="language-plaintext highlighter-rouge">1.1.1.1</code> knows nothing about my private <code class="language-plaintext highlighter-rouge">/etc/hosts</code> entries.</p>

<p>This is by design. From the <a href="https://www.freedesktop.org/software/systemd/man/latest/systemd-resolved.service.html">systemd-resolved documentation</a>:</p>

<blockquote>
  <p>The nss-dns resolver maintains little state between subsequent DNS queries, and for each query always talks to the first listed DNS server from /etc/resolv.conf first, and on failure continues with the next until reaching the end of the list which is when the query fails. The resolver in systemd-resolved however maintains state, and will continuously talk to the same server for all queries in a particular lookup scope until some form of error is seen at which point it will switch to the next server, and then stay with it for all queries on the scope until the next failure, and so on, eventually returning to the first configured server. This is done to optimize lookup times, in particular given that the resolver typically must first probe server feature sets when talking to a server, which takes time. <strong>This different behaviour implies that listed DNS servers per lookup scope must be equivalent in the zones they serve, so that sending a query to one of them will yield the same results as sending it to another configured DNS server.</strong></p>
</blockquote>

<p>In other words: all configured DNS servers within a scope are treated as <strong>interchangeable</strong>. systemd-resolved picks one, sticks with it, and only rotates on failure. If <code class="language-plaintext highlighter-rouge">1.1.1.1</code> responds (even with NXDOMAIN), that counts as “working” — so it never bothers trying the forwarder.</p>

<p>The relevant selection logic lives in <a href="https://github.com/systemd/systemd/blob/main/src/resolve/resolved-dns-scope.c"><code class="language-plaintext highlighter-rouge">resolved-dns-scope.c</code></a> (<code class="language-plaintext highlighter-rouge">dns_scope_get_dns_server()</code>) and <a href="https://github.com/systemd/systemd/blob/main/src/resolve/resolved-dns-server.c"><code class="language-plaintext highlighter-rouge">resolved-dns-server.c</code></a> (<code class="language-plaintext highlighter-rouge">manager_next_dns_server()</code>).</p>

<h2 id="the-fix">The Fix</h2>

<p>The fix is straightforward: advertise <strong>only</strong> the forwarder’s IP via DHCP, so the VM’s systemd-resolved has no choice but to use it. No public servers in the mix means no wrong server to stick to.</p>

<h2 id="forwarding-to-systemd-resolved">Forwarding to systemd-resolved</h2>

<p>But the previous forwarder design had a gap. As described in the <a href="/devops/dns/virtualization/2026/01/30/Simple-DNS-forwarder.html">earlier post</a>, it read upstream servers from <code class="language-plaintext highlighter-rouge">/run/systemd/resolve/resolv.conf</code> — which contains the real upstream DNS servers (like <code class="language-plaintext highlighter-rouge">8.8.8.8</code>), bypassing systemd-resolved entirely. That means the forwarder also bypassed everything systemd-resolved provides: <code class="language-plaintext highlighter-rouge">/etc/hosts</code> resolution, mDNS, split-DNS, VPN routing.</p>

<p>What if the forwarder just forwarded to <code class="language-plaintext highlighter-rouge">127.0.0.53</code> instead?</p>

<p>It turns out this is easy to do. As explained in the <a href="/devops/networking/virtualization/2025/11/29/Network-Namespaces-Isolating-VM-Networking.html">network namespaces post</a>, the DNS forwarder runs in the <strong>root network namespace</strong> — it listens on the gateway IP (the host-side end of the veth pair), which is reachable from the VM namespace. Since it’s in the root namespace, it can talk to <code class="language-plaintext highlighter-rouge">127.0.0.53</code> directly.</p>

<div class="language-plaintext highlighter-rouge"><div class="highlight"><pre class="highlight"><code>VM query ──► gateway IP:53 (forwarder, root ns) ──► 127.0.0.53 (systemd-resolved)
                                                         │
                                                         ├── /etc/hosts
                                                         ├── /etc/resolv.conf
                                                         ├── mDNS
                                                         ├── VPN split-DNS
                                                         └── ...
</code></pre></div></div>

<p>The forwarder just needed one small extension — a <code class="language-plaintext highlighter-rouge">WithUpstreams</code> option that accepts static upstream addresses instead of reading from a file:</p>

<div class="language-go highlighter-rouge"><div class="highlight"><pre class="highlight"><code><span class="n">forwarder</span><span class="p">,</span> <span class="n">err</span> <span class="o">:=</span> <span class="n">dns</span><span class="o">.</span><span class="n">NewDNSFailoverForwarder</span><span class="p">(</span><span class="n">ctx</span><span class="p">,</span>
    <span class="n">dns</span><span class="o">.</span><span class="n">WithForwarderAddress</span><span class="p">(</span><span class="n">gatewayIP</span><span class="p">),</span>
    <span class="n">dns</span><span class="o">.</span><span class="n">WithForwarderTimeout</span><span class="p">(</span><span class="m">2</span><span class="o">*</span><span class="n">time</span><span class="o">.</span><span class="n">Second</span><span class="p">),</span>
    <span class="n">dns</span><span class="o">.</span><span class="n">WithUpstreams</span><span class="p">([]</span><span class="kt">string</span><span class="p">{</span><span class="s">"127.0.0.53:53"</span><span class="p">}),</span>
<span class="p">)</span>
</code></pre></div></div>

<p>When <code class="language-plaintext highlighter-rouge">WithUpstreams</code> is provided, the forwarder stores the addresses directly — no file watching, no fsnotify, no resolv.conf parsing. When it’s not provided, the existing behavior kicks in: watch <code class="language-plaintext highlighter-rouge">resolv.conf</code> and update upstreams dynamically.</p>

<p>The configuration is modeled as a protobuf <code class="language-plaintext highlighter-rouge">oneof</code>, making the two modes mutually exclusive:</p>

<div class="language-protobuf highlighter-rouge"><div class="highlight"><pre class="highlight"><code><span class="kd">message</span> <span class="nc">Dns</span> <span class="p">{</span>
    <span class="kt">string</span> <span class="na">zone</span> <span class="o">=</span> <span class="mi">1</span><span class="p">;</span>
    <span class="k">oneof</span> <span class="n">upstream</span> <span class="p">{</span>
        <span class="kt">string</span> <span class="na">resolv_conf</span> <span class="o">=</span> <span class="mi">2</span><span class="p">;</span>
        <span class="n">StaticUpstreams</span> <span class="na">static</span> <span class="o">=</span> <span class="mi">3</span><span class="p">;</span>
    <span class="p">}</span>
<span class="p">}</span>
</code></pre></div></div>

<p>When neither is set, the forwarder falls back to auto-detecting the resolv.conf path — preserving full backward compatibility.</p>

<h2 id="covering-all-cases">Covering All Cases</h2>

<p>This naturally leads to three deployment modes, each covering different environments:</p>

<p><strong>systemd-resolved (most Linux desktops/servers):</strong> Use static upstreams pointing to <code class="language-plaintext highlighter-rouge">127.0.0.53</code>. Gets <code class="language-plaintext highlighter-rouge">/etc/hosts</code>, mDNS, split-DNS, VPN — everything systemd-resolved handles.</p>

<div class="language-json highlighter-rouge"><div class="highlight"><pre class="highlight"><code><span class="nl">"dns"</span><span class="p">:</span><span class="w"> </span><span class="p">{</span><span class="w">
    </span><span class="nl">"zone"</span><span class="p">:</span><span class="w"> </span><span class="s2">"."</span><span class="p">,</span><span class="w">
    </span><span class="nl">"static"</span><span class="p">:</span><span class="w"> </span><span class="p">{</span><span class="w">
        </span><span class="nl">"endpoints"</span><span class="p">:</span><span class="w"> </span><span class="p">[</span><span class="s2">"127.0.0.53:53"</span><span class="p">]</span><span class="w">
    </span><span class="p">}</span><span class="w">
</span><span class="p">}</span><span class="w">
</span></code></pre></div></div>

<p><strong>Non-systemd with resolv.conf:</strong> Use the dynamic resolv.conf watcher. The forwarder picks up upstream changes automatically.</p>

<div class="language-json highlighter-rouge"><div class="highlight"><pre class="highlight"><code><span class="nl">"dns"</span><span class="p">:</span><span class="w"> </span><span class="p">{</span><span class="w">
    </span><span class="nl">"zone"</span><span class="p">:</span><span class="w"> </span><span class="s2">"."</span><span class="p">,</span><span class="w">
    </span><span class="nl">"resolv_conf"</span><span class="p">:</span><span class="w"> </span><span class="s2">"/etc/resolv.conf"</span><span class="w">
</span><span class="p">}</span><span class="w">
</span></code></pre></div></div>

<p><strong>Non-systemd with CoreDNS:</strong> For environments where CoreDNS plugins are needed (e.g., the <a href="https://coredns.io/plugins/hosts/"><code class="language-plaintext highlighter-rouge">hosts</code> plugin</a> for <code class="language-plaintext highlighter-rouge">/etc/hosts</code> support), qcontroller also supports an embedded CoreDNS backend:</p>

<div class="language-go highlighter-rouge"><div class="highlight"><pre class="highlight"><code><span class="n">server</span><span class="p">,</span> <span class="n">err</span> <span class="o">:=</span> <span class="n">dns</span><span class="o">.</span><span class="n">NewCoreDNSServer</span><span class="p">(</span><span class="n">ctx</span><span class="p">,</span>
    <span class="n">dns</span><span class="o">.</span><span class="n">WithForwarderAddress</span><span class="p">(</span><span class="n">gatewayIP</span><span class="p">),</span>
    <span class="n">dns</span><span class="o">.</span><span class="n">WithResolvconfPath</span><span class="p">(</span><span class="s">"/etc/resolv.conf"</span><span class="p">),</span>
<span class="p">)</span>
</code></pre></div></div>

<h2 id="conclusion">Conclusion</h2>

<p>The root cause came down to a design assumption in systemd-resolved: all configured DNS servers must be equivalent. When some know about private resources and others don’t, things break in subtle, hard-to-debug ways.</p>

<p>The fix turned out to be small. The forwarder already ran in the root namespace, so <code class="language-plaintext highlighter-rouge">127.0.0.53</code> was right there. Adding a <code class="language-plaintext highlighter-rouge">WithUpstreams</code> option and a <code class="language-plaintext highlighter-rouge">oneof</code> in the protobuf schema was enough to make it work. VMs get full host DNS resolution — <code class="language-plaintext highlighter-rouge">/etc/hosts</code>, VPN, mDNS — without touching their configuration.</p>]]></content><author><name>Nikita Vakula</name></author><category term="devops" /><category term="dns" /><category term="virtualization" /><category term="go" /><category term="networking" /><category term="dns" /><category term="systemd" /><summary type="html"><![CDATA[systemd-resolved treats all configured DNS servers as equivalent. Here's why that breaks private DNS resources in VMs and how I worked around it.]]></summary></entry><entry><title type="html">Giving Your AI the Right Context with Model Context Protocol (MCP)</title><link href="https://krjakbrjak.github.io/ai/tooling/2026/03/09/Giving-Your-AI-the-Right-Context-with-MCP.html" rel="alternate" type="text/html" title="Giving Your AI the Right Context with Model Context Protocol (MCP)" /><published>2026-03-09T00:00:00+00:00</published><updated>2026-03-09T00:00:00+00:00</updated><id>https://krjakbrjak.github.io/ai/tooling/2026/03/09/Giving%20Your%20AI%20the%20Right%20Context%20with%20MCP</id><content type="html" xml:base="https://krjakbrjak.github.io/ai/tooling/2026/03/09/Giving-Your-AI-the-Right-Context-with-MCP.html"><![CDATA[<p>Nowadays, pretty much everyone works with AI one way or another. Whether it’s writing code, debugging, designing infrastructure — LLMs have pushed our productivity to yet another level. But here’s the thing: in order to utilize their power more efficiently, we can actually help them be more efficient. That’s where the Model Context Protocol (MCP) comes in — and in this post, I’ll show how to build a simple MCP server in Go.</p>

<h2 id="the-problem">The Problem</h2>

<p>Say you’re working on a backend. You have your data — maybe a database, maybe an API — and you want to think about what kind of interface or tooling you could build around it. You open your favorite AI assistant and start describing your data structures. “I have a books table with id, title, author, and a loans table that references…” — you get the idea. It works, but it’s tedious. You’re essentially doing the model’s homework.</p>

<p>Why not just let it look at the data directly?</p>

<p>For a small service without authentication, sure — you could point it at an endpoint and say “fetch some data, see its structure.” But imagine you’re working on something bigger. Something behind authentication layers, internal APIs, complex data relationships. You can’t just hand the model a URL and hope for the best.</p>

<p>Instead, you could build a small application that sits between the model and your backend — something that knows how to pull the data and explain its shape to the model. The model calls your app, your app talks to the backend, and the model gets exactly the context it needs.</p>

<p>You get the idea. If only there was a standard protocol for this…</p>

<h2 id="what-is-model-context-protocol-mcp">What is Model Context Protocol (MCP)?</h2>

<p>It’s called the <a href="https://modelcontextprotocol.io">Model Context Protocol (MCP)</a>, designed by Anthropic. And it’s exactly what you’d want.</p>

<p>MCP defines a standard way for AI models to discover and call external tools. Your app becomes an MCP server — it advertises what it can do (search, fetch, create, whatever), and the model calls those tools when it needs context. No more manual copy-pasting. No more describing your data schema in a chat window.</p>

<h2 id="a-simple-example-library-catalog">A Simple Example: Library Catalog</h2>

<p>To see how this works in practice, I built a tiny MCP server in Go — a library catalog. Two tools: search books and get book details.</p>

<p>Here’s the MCP server configuration (<code class="language-plaintext highlighter-rouge">.mcp.json</code>), placed in the root of your workspace. This file defines MCP servers that provide additional context and capabilities to the AI client (e.g. Claude Code):</p>

<div class="language-json highlighter-rouge"><div class="highlight"><pre class="highlight"><code><span class="p">{</span><span class="w">
  </span><span class="nl">"mcpServers"</span><span class="p">:</span><span class="w"> </span><span class="p">{</span><span class="w">
    </span><span class="nl">"library"</span><span class="p">:</span><span class="w"> </span><span class="p">{</span><span class="w">
      </span><span class="nl">"command"</span><span class="p">:</span><span class="w"> </span><span class="s2">"./mcp-library"</span><span class="p">,</span><span class="w">
      </span><span class="nl">"args"</span><span class="p">:</span><span class="w"> </span><span class="p">[]</span><span class="w">
    </span><span class="p">}</span><span class="w">
  </span><span class="p">}</span><span class="w">
</span><span class="p">}</span><span class="w">
</span></code></pre></div></div>

<p>And the server itself — using the <a href="https://github.com/modelcontextprotocol/go-sdk">official Go SDK</a>:</p>

<div class="language-go highlighter-rouge"><div class="highlight"><pre class="highlight"><code><span class="n">server</span> <span class="o">:=</span> <span class="n">mcp</span><span class="o">.</span><span class="n">NewServer</span><span class="p">(</span><span class="o">&amp;</span><span class="n">mcp</span><span class="o">.</span><span class="n">Implementation</span><span class="p">{</span>
    <span class="n">Name</span><span class="o">:</span>    <span class="s">"library-mcp"</span><span class="p">,</span>
    <span class="n">Version</span><span class="o">:</span> <span class="s">"1.0.0"</span><span class="p">,</span>
<span class="p">},</span> <span class="no">nil</span><span class="p">)</span>

<span class="n">server</span><span class="o">.</span><span class="n">AddTool</span><span class="p">(</span>
    <span class="o">&amp;</span><span class="n">mcp</span><span class="o">.</span><span class="n">Tool</span><span class="p">{</span>
        <span class="n">Name</span><span class="o">:</span>        <span class="s">"search_books"</span><span class="p">,</span>
        <span class="n">Description</span><span class="o">:</span> <span class="s">"Search the library catalog. Returns matching books."</span><span class="p">,</span>
        <span class="n">InputSchema</span><span class="o">:</span> <span class="n">json</span><span class="o">.</span><span class="n">RawMessage</span><span class="p">(</span><span class="s">`{
            "type": "object",
            "properties": {
                "title":  {"type": "string", "description": "Filter by book title."},
                "author": {"type": "string", "description": "Filter by author name."}
            }
        }`</span><span class="p">),</span>
    <span class="p">},</span>
    <span class="k">func</span><span class="p">(</span><span class="n">ctx</span> <span class="n">context</span><span class="o">.</span><span class="n">Context</span><span class="p">,</span> <span class="n">req</span> <span class="o">*</span><span class="n">mcp</span><span class="o">.</span><span class="n">CallToolRequest</span><span class="p">)</span> <span class="p">(</span><span class="o">*</span><span class="n">mcp</span><span class="o">.</span><span class="n">CallToolResult</span><span class="p">,</span> <span class="kt">error</span><span class="p">)</span> <span class="p">{</span>
        <span class="n">args</span> <span class="o">:=</span> <span class="n">parseArgs</span><span class="p">(</span><span class="n">req</span><span class="p">)</span>
        <span class="n">result</span><span class="p">,</span> <span class="n">err</span> <span class="o">:=</span> <span class="n">searchBooks</span><span class="p">(</span><span class="n">ctx</span><span class="p">,</span> <span class="n">str</span><span class="p">(</span><span class="n">args</span><span class="p">,</span> <span class="s">"title"</span><span class="p">),</span> <span class="n">str</span><span class="p">(</span><span class="n">args</span><span class="p">,</span> <span class="s">"author"</span><span class="p">))</span>
        <span class="k">return</span> <span class="n">textResult</span><span class="p">(</span><span class="n">result</span><span class="p">,</span> <span class="n">err</span><span class="p">)</span>
    <span class="p">},</span>
<span class="p">)</span>

<span class="n">server</span><span class="o">.</span><span class="n">AddTool</span><span class="p">(</span>
    <span class="o">&amp;</span><span class="n">mcp</span><span class="o">.</span><span class="n">Tool</span><span class="p">{</span>
        <span class="n">Name</span><span class="o">:</span>        <span class="s">"get_book"</span><span class="p">,</span>
        <span class="n">Description</span><span class="o">:</span> <span class="s">"Get full details for a book by its ID, including loan history."</span><span class="p">,</span>
        <span class="n">InputSchema</span><span class="o">:</span> <span class="n">json</span><span class="o">.</span><span class="n">RawMessage</span><span class="p">(</span><span class="s">`{
            "type": "object",
            "properties": {
                "id": {"type": "string", "description": "The book ID."}
            },
            "required": ["id"]
        }`</span><span class="p">),</span>
    <span class="p">},</span>
    <span class="k">func</span><span class="p">(</span><span class="n">ctx</span> <span class="n">context</span><span class="o">.</span><span class="n">Context</span><span class="p">,</span> <span class="n">req</span> <span class="o">*</span><span class="n">mcp</span><span class="o">.</span><span class="n">CallToolRequest</span><span class="p">)</span> <span class="p">(</span><span class="o">*</span><span class="n">mcp</span><span class="o">.</span><span class="n">CallToolResult</span><span class="p">,</span> <span class="kt">error</span><span class="p">)</span> <span class="p">{</span>
        <span class="n">args</span> <span class="o">:=</span> <span class="n">parseArgs</span><span class="p">(</span><span class="n">req</span><span class="p">)</span>
        <span class="n">result</span><span class="p">,</span> <span class="n">err</span> <span class="o">:=</span> <span class="n">getBook</span><span class="p">(</span><span class="n">ctx</span><span class="p">,</span> <span class="n">str</span><span class="p">(</span><span class="n">args</span><span class="p">,</span> <span class="s">"id"</span><span class="p">))</span>
        <span class="k">return</span> <span class="n">textResult</span><span class="p">(</span><span class="n">result</span><span class="p">,</span> <span class="n">err</span><span class="p">)</span>
    <span class="p">},</span>
<span class="p">)</span>

<span class="k">if</span> <span class="n">err</span> <span class="o">:=</span> <span class="n">server</span><span class="o">.</span><span class="n">Run</span><span class="p">(</span><span class="n">context</span><span class="o">.</span><span class="n">Background</span><span class="p">(),</span> <span class="o">&amp;</span><span class="n">mcp</span><span class="o">.</span><span class="n">StdioTransport</span><span class="p">{});</span> <span class="n">err</span> <span class="o">!=</span> <span class="no">nil</span> <span class="p">{</span>
    <span class="n">log</span><span class="o">.</span><span class="n">Fatal</span><span class="p">(</span><span class="n">err</span><span class="p">)</span>
<span class="p">}</span>
</code></pre></div></div>

<p>Each tool declares its name, description, and input schema — this is what the model sees. When the model decides it needs to search for books by Tolkien, it calls <code class="language-plaintext highlighter-rouge">search_books</code> with <code class="language-plaintext highlighter-rouge">{"author": "Tolkien"}</code>. The server does the lookup and returns the results. The model never had to be told what the data looks like — it discovered and queried it on its own.</p>

<h2 id="what-this-looks-like-in-practice">What This Looks Like in Practice</h2>

<p>With this MCP server running, I can open Claude Code in my project directory and just have a conversation:</p>

<blockquote>
  <p>Are there any books by Tolkien?</p>
</blockquote>

<p>The model picks up the <code class="language-plaintext highlighter-rouge">search_books</code> tool, calls it with the right filter, and comes back with the results. No prompting gymnastics. No pasting JSON blobs. It just works.</p>

<p align="center">
  <img src="/images/posts/Giving Your AI the Right Context with MCP/mcp-example.png" alt="Claude Code using an MCP server to search a library catalog" />
</p>

<p>And the best part — this is a trivial example with hardcoded data. Replace the mock data with actual database queries or API calls to your production backend, and you’ve got yourself an AI assistant that truly understands your system.</p>

<h2 id="conclusion">Conclusion</h2>

<p>MCP bridges the gap between what the model can do and what it knows about your specific context. Instead of explaining your world to the model, you give it the tools to explore it. The protocol is open, the SDKs are available in multiple languages, and the integration with tools like Claude Code is already there.</p>

<p>If you’re building anything where an LLM could benefit from knowing your data — and let’s be honest, that’s most things these days — MCP is worth looking into.</p>

<p>The full source code for this example is available <a href="https://gist.github.com/krjakbrjak/d8522e7c6f969305141e91e8523bf31c">here</a>.</p>]]></content><author><name>Nikita Vakula</name></author><category term="ai" /><category term="tooling" /><category term="mcp" /><category term="llm" /><category term="go" /><category term="claude" /><summary type="html"><![CDATA[How to build a small MCP server in Go that lets AI models discover and query your data directly, replacing manual copy-pasting with structured tool calls.]]></summary></entry><entry><title type="html">Writing a BPF packet filter on macOS in Go</title><link href="https://krjakbrjak.github.io/devops/networking/macos/2026/02/19/Writing-a-BPF-packet-filter-on-macOS-in-Go.html" rel="alternate" type="text/html" title="Writing a BPF packet filter on macOS in Go" /><published>2026-02-19T00:00:00+00:00</published><updated>2026-02-19T00:00:00+00:00</updated><id>https://krjakbrjak.github.io/devops/networking/macos/2026/02/19/Writing%20a%20BPF%20packet%20filter%20on%20macOS%20in%20Go</id><content type="html" xml:base="https://krjakbrjak.github.io/devops/networking/macos/2026/02/19/Writing-a-BPF-packet-filter-on-macOS-in-Go.html"><![CDATA[<div class="language-plaintext highlighter-rouge"><div class="highlight"><pre class="highlight"><code> 
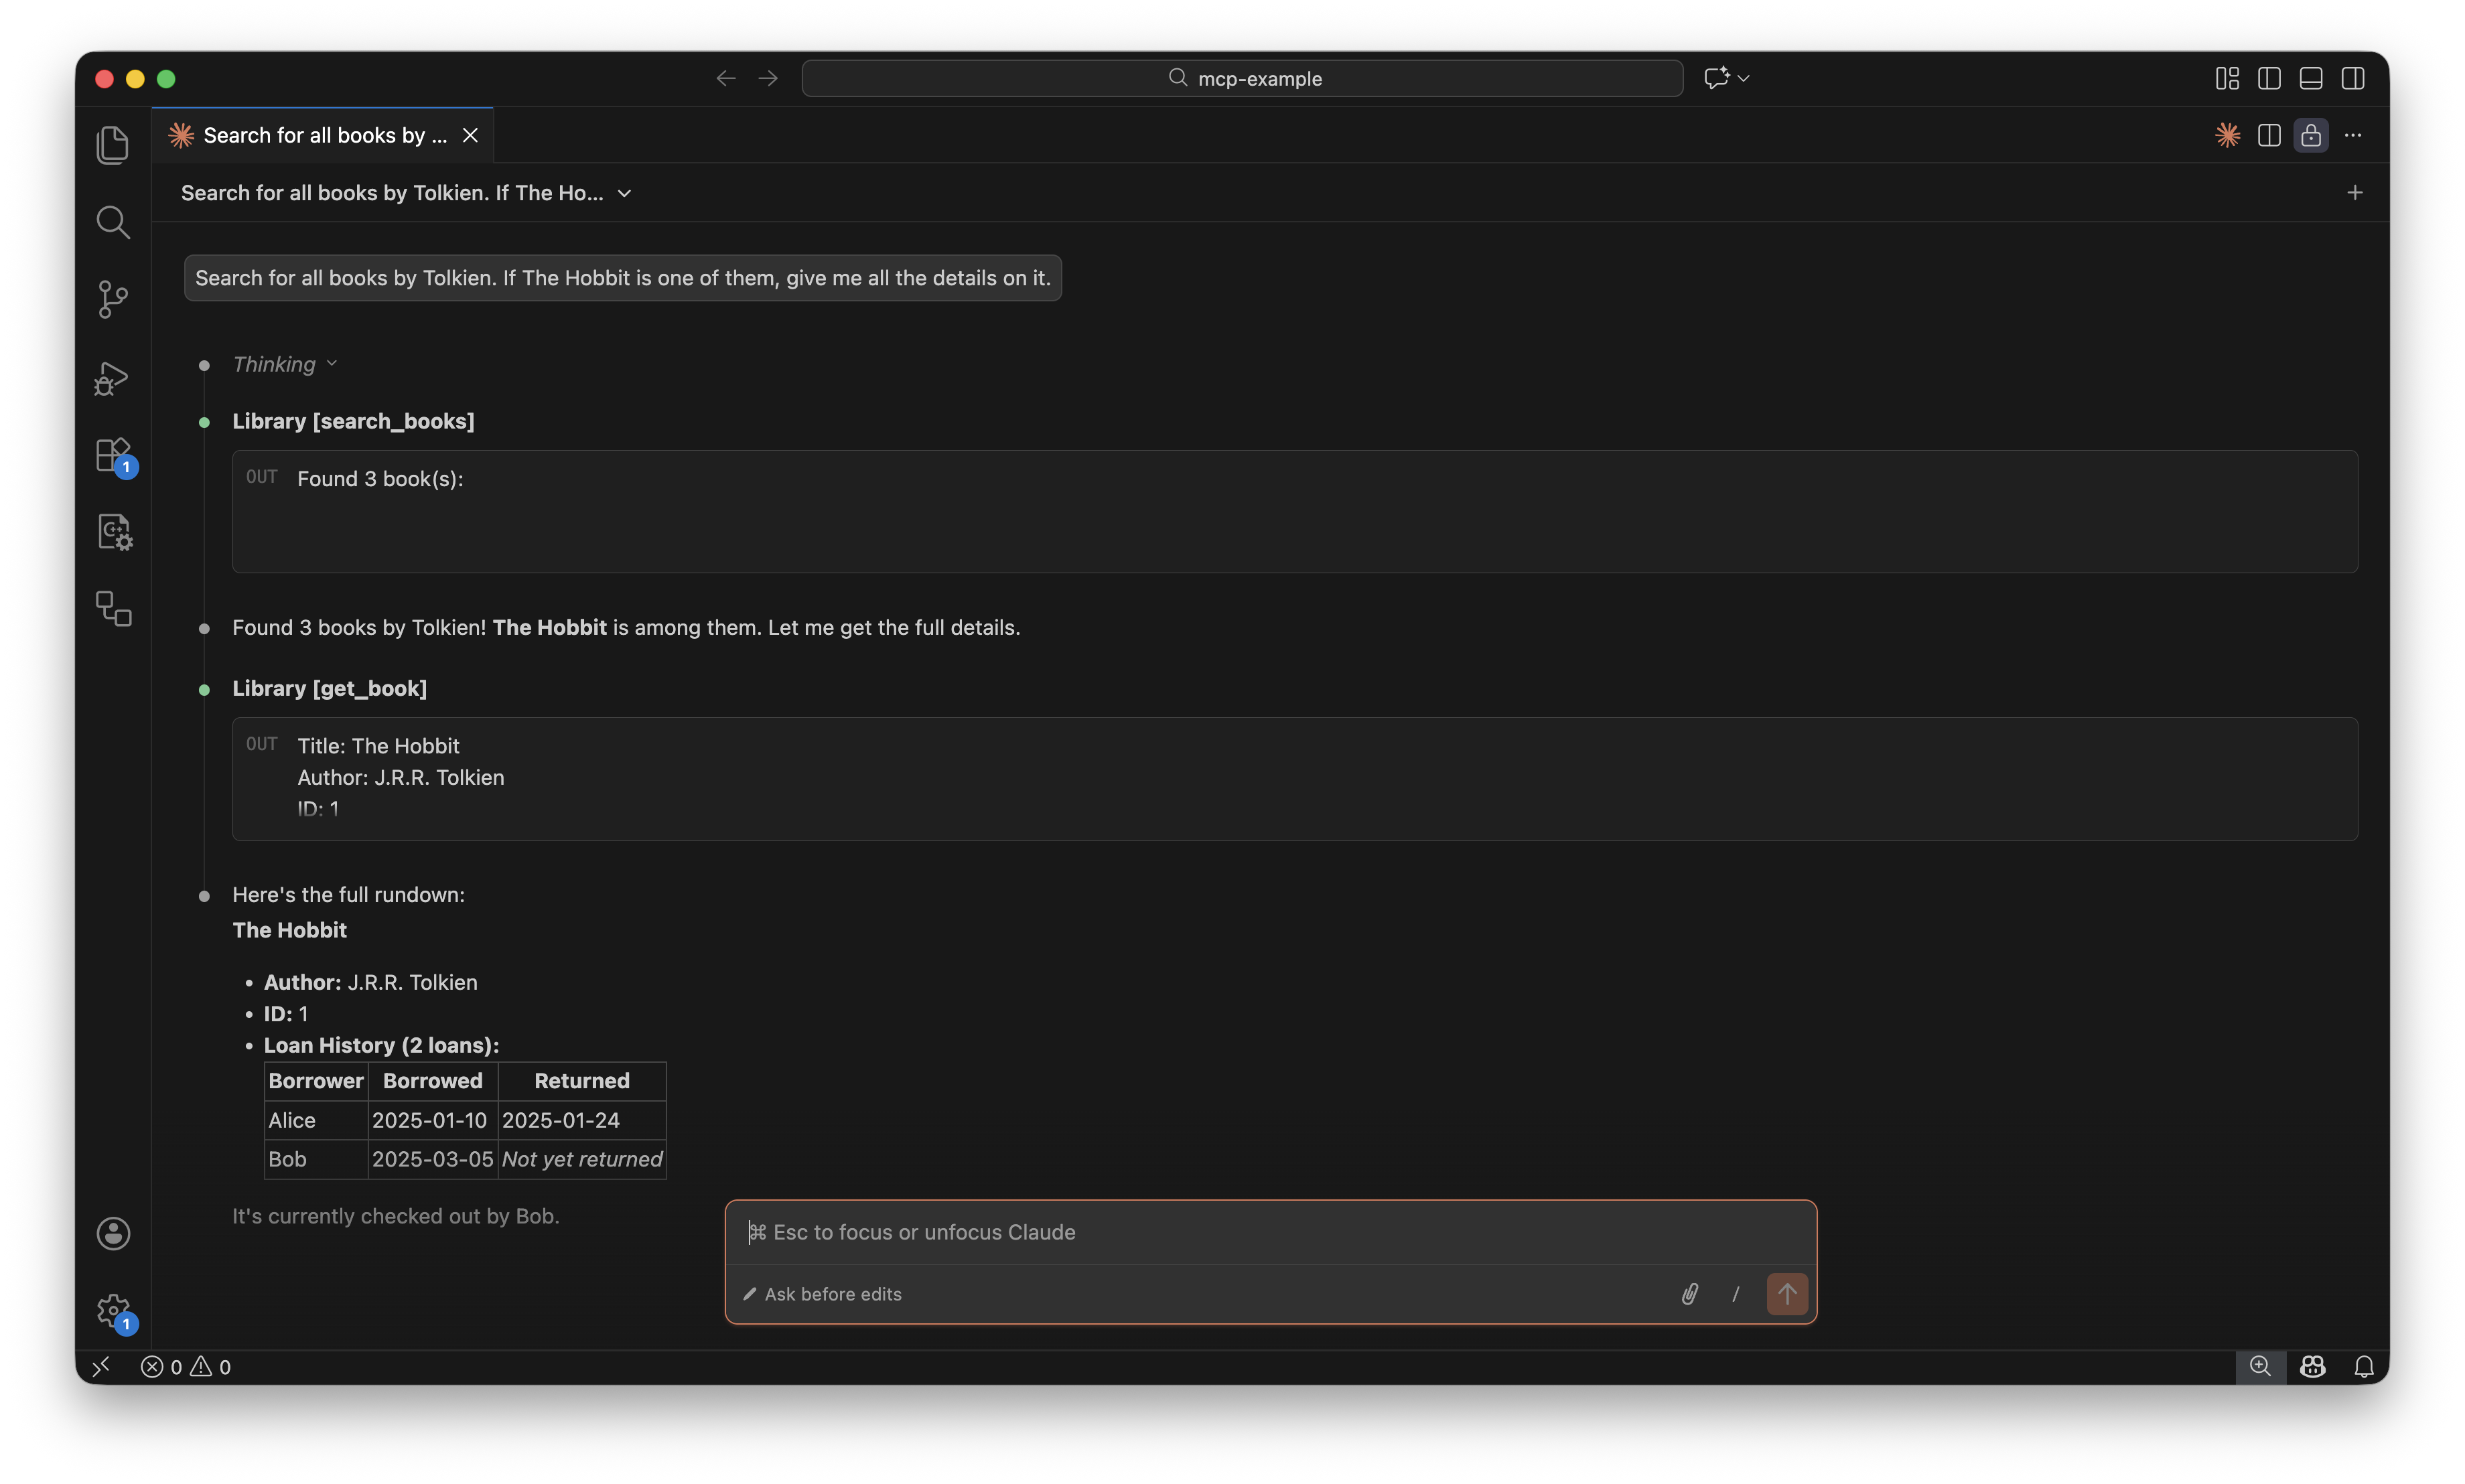
Without filter                 With BPF filter

  Network     Userspace          Network     Userspace
 ┌───────┐   ┌─────────┐       ┌───────┐   ┌─────────┐
 │  ARP  │──→│  ARP    │       │  ARP  │──→│  ARP    │
 │  IPv4 │──→│  IPv4   │       │  IPv4 │   │  reply  │
 │  ARP  │──→│  ARP    │       │  ARP  │   │         │
 │  IPv6 │──→│  IPv6   │       │  IPv6 │   │         │
 │  IPv4 │──→│  IPv4   │       │  IPv4 │   │         │
 │  ARP  │──→│  ARP    │       │  ARP  │   │         │
 │  ...  │──→│  ...    │       │  ...  │   │         │
 └───────┘   └─────────┘       └───────┘   └─────────┘
  ~10,000     ~10,000            ~10,000       ~100
  packets     copied             packets      copied

  App filters in userspace       Kernel filters before copy
</code></pre></div></div>

<h2 id="the-problem-discovering-vm-ip-addresses-without-a-guest-agent">The problem: discovering VM IP addresses without a guest agent</h2>

<p>In a recent change to qcontroller, I removed the dependency on QEMU Guest Agent (QGA) for discovering a VM’s IP address. Previously, users had to install QGA inside every VM—easy enough with cloud-init, but still a hard requirement just to answer the question “what IP did this VM get?”</p>

<p>The alternative: ARP scanning. I already control the MAC addresses assigned to VMs, so I can periodically broadcast ARP requests on the virtual network interface and match the replies against known MACs. Pure Layer 2, no guest cooperation needed.</p>

<p>This post isn’t about the ARP scanner itself (that’s in <a href="https://github.com/q-controller/qcontroller/pull/26">PR #26</a>). It’s about a problem I hit on macOS, and how six lines of BPF bytecode solved it. The BPF filter is implemented in <a href="https://github.com/q-controller/qcontroller/pull/27">PR #27</a>.</p>

<h2 id="raw-sockets-on-macos-there-arent-any">Raw sockets on macOS: there aren’t any</h2>

<p>On Linux, you open an <code class="language-plaintext highlighter-rouge">AF_PACKET</code> socket, bind it to an interface, and you’re reading raw Ethernet frames. macOS doesn’t support <code class="language-plaintext highlighter-rouge">AF_PACKET</code>. Instead, you go through BPF—Berkeley Packet Filter.</p>

<p>The setup looks roughly like this:</p>

<ol>
  <li>Open <code class="language-plaintext highlighter-rouge">/dev/bpf0</code> (or <code class="language-plaintext highlighter-rouge">/dev/bpf1</code>, <code class="language-plaintext highlighter-rouge">/dev/bpf2</code>, … — you try them until one is available)</li>
  <li>Bind it to a network interface with <code class="language-plaintext highlighter-rouge">BIOCSETIF</code></li>
  <li>Enable immediate mode with <code class="language-plaintext highlighter-rouge">BIOCIMMEDIATE</code> so reads return as soon as a packet arrives, rather than waiting for the buffer to fill</li>
  <li>Optionally enable promiscuous mode with <code class="language-plaintext highlighter-rouge">BIOCPROMISC</code></li>
  <li>Read from the file descriptor—you get raw Ethernet frames, each prefixed by a <code class="language-plaintext highlighter-rouge">bpf_hdr</code> struct</li>
</ol>

<p>This works. But there’s a catch.</p>

<h2 id="the-flood">The flood</h2>

<p>Promiscuous mode means the BPF device captures <em>everything</em> on the wire—not just frames addressed to your MAC. On my home network, which has maybe a dozen devices, a few seconds of capture produced roughly:</p>

<ul>
  <li>~9,400 ARP frames (requests and replies from all devices)</li>
  <li>~190 IPv4 frames</li>
  <li>~50 IPv6 frames</li>
</ul>

<p>That’s about <strong>10,000 frames</strong> copied from kernel to userspace, where my Go code then checks each one: is it ARP? Is it a reply? Does the sender MAC match a VM I care about? For 99% of those frames, the answer is no.</p>

<p>On a busier network—an office, a data center—this gets much worse. We’re doing an O(n) scan of the entire network’s chatter to find the handful of ARP replies we actually need. The kernel already has all these frames in its buffers; we’re just making it copy them all to us so we can throw most away.</p>

<h2 id="bpf-is-more-than-a-packet-source">BPF is more than a packet source</h2>

<p>Here’s the coolest thing about BPF: it’s not just a mechanism for reading packets. It includes a programmable filter that runs <em>inside the kernel</em>, before packets are copied to userspace. The “F” in BPF stands for Filter, and that filter is the interesting part.</p>

<p>BPF defines a small virtual machine with:</p>

<ul>
  <li><strong>Two registers</strong>: <code class="language-plaintext highlighter-rouge">A</code> (accumulator) and <code class="language-plaintext highlighter-rouge">X</code> (index), both 32-bit</li>
  <li><strong>A small instruction set</strong>: load, store, jump, arithmetic, return</li>
</ul>

<p>The VM operates on the raw packet data. Instructions can load bytes from specific offsets in the packet, compare them, and either accept or reject the packet. The kernel runs this program on every incoming frame. Only frames that pass the filter get copied to userspace.</p>

<p>This is the same mechanism that powers <code class="language-plaintext highlighter-rouge">tcpdump</code> expressions. When you write <code class="language-plaintext highlighter-rouge">tcpdump arp</code>, tcpdump compiles that into BPF bytecode and installs it via <code class="language-plaintext highlighter-rouge">BIOCSETF</code>. We can do the same thing.</p>

<h2 id="the-ethernet-frame-layout">The Ethernet frame layout</h2>

<p>To write a BPF filter, you need to know exactly what bytes you’re looking at. An Ethernet frame carrying an ARP message is 42 bytes:</p>

<div class="language-plaintext highlighter-rouge"><div class="highlight"><pre class="highlight"><code>Ethernet header (14 bytes):
  [0:6]   Destination MAC (broadcast: ff:ff:ff:ff:ff:ff)
  [6:12]  Source MAC
  [12:14] EtherType         ← 0x0806 means ARP

ARP payload (28 bytes):
  [14:16] Hardware type      (1 = Ethernet)
  [16:18] Protocol type      (0x0800 = IPv4)
  [18]    Hardware addr len   (6)
  [19]    Protocol addr len   (4)
  [20:22] Operation          ← 1 = request, 2 = reply
  [22:28] Sender MAC
  [28:32] Sender IP
  [32:38] Target MAC
  [38:42] Target IP
</code></pre></div></div>

<p>Two fields matter for filtering:</p>

<ul>
  <li><strong>Byte offset 12</strong> (2 bytes): the EtherType. If it’s not <code class="language-plaintext highlighter-rouge">0x0806</code>, this isn’t ARP—drop it.</li>
  <li><strong>Byte offset 20</strong> (2 bytes): the ARP opcode. If it’s not <code class="language-plaintext highlighter-rouge">0x0002</code>, this isn’t a reply—drop it.</li>
</ul>

<h2 id="the-filter-six-instructions">The filter: six instructions</h2>

<p>Here’s the complete BPF program using the <code class="language-plaintext highlighter-rouge">BPF_STMT</code>/<code class="language-plaintext highlighter-rouge">BPF_JUMP</code> macros from the <a href="https://man.openbsd.org/bpf.4">bpf(4) man page</a>:</p>

<div class="language-c highlighter-rouge"><div class="highlight"><pre class="highlight"><code><span class="n">BPF_STMT</span><span class="p">(</span><span class="n">BPF_LD</span><span class="o">+</span><span class="n">BPF_H</span><span class="o">+</span><span class="n">BPF_ABS</span><span class="p">,</span> <span class="mi">12</span><span class="p">),</span>            <span class="c1">// A = halfword at offset 12 (EtherType)</span>
<span class="n">BPF_JUMP</span><span class="p">(</span><span class="n">BPF_JMP</span><span class="o">+</span><span class="n">BPF_JEQ</span><span class="o">+</span><span class="n">BPF_K</span><span class="p">,</span> <span class="mh">0x0806</span><span class="p">,</span> <span class="mi">0</span><span class="p">,</span> <span class="mi">3</span><span class="p">),</span> <span class="c1">// if A == 0x0806 (ARP) continue, else skip 3 to drop</span>
<span class="n">BPF_STMT</span><span class="p">(</span><span class="n">BPF_LD</span><span class="o">+</span><span class="n">BPF_H</span><span class="o">+</span><span class="n">BPF_ABS</span><span class="p">,</span> <span class="mi">20</span><span class="p">),</span>            <span class="c1">// A = halfword at offset 20 (ARP opcode)</span>
<span class="n">BPF_JUMP</span><span class="p">(</span><span class="n">BPF_JMP</span><span class="o">+</span><span class="n">BPF_JEQ</span><span class="o">+</span><span class="n">BPF_K</span><span class="p">,</span> <span class="mh">0x0002</span><span class="p">,</span> <span class="mi">0</span><span class="p">,</span> <span class="mi">1</span><span class="p">),</span> <span class="c1">// if A == 0x0002 (reply) continue, else skip 1 to drop</span>
<span class="n">BPF_STMT</span><span class="p">(</span><span class="n">BPF_RET</span><span class="o">+</span><span class="n">BPF_K</span><span class="p">,</span> <span class="mh">0xFFFFFFFF</span><span class="p">),</span>            <span class="c1">// ACCEPT: return entire packet</span>
<span class="n">BPF_STMT</span><span class="p">(</span><span class="n">BPF_RET</span><span class="o">+</span><span class="n">BPF_K</span><span class="p">,</span> <span class="mi">0</span><span class="p">),</span>                     <span class="c1">// DROP: return 0 bytes (discard)</span>
</code></pre></div></div>

<p><code class="language-plaintext highlighter-rouge">BPF_STMT(code, k)</code> encodes a non-branching instruction. <code class="language-plaintext highlighter-rouge">BPF_JUMP(code, k, jt, jf)</code> encodes a conditional branch where <code class="language-plaintext highlighter-rouge">jt</code> and <code class="language-plaintext highlighter-rouge">jf</code> are the number of instructions to skip forward on true/false. The <code class="language-plaintext highlighter-rouge">code</code> field is built by combining a class (<code class="language-plaintext highlighter-rouge">BPF_LD</code>, <code class="language-plaintext highlighter-rouge">BPF_JMP</code>, <code class="language-plaintext highlighter-rouge">BPF_RET</code>), a size (<code class="language-plaintext highlighter-rouge">BPF_H</code> for halfword—2 bytes), and an addressing mode (<code class="language-plaintext highlighter-rouge">BPF_ABS</code> for absolute packet offset, <code class="language-plaintext highlighter-rouge">BPF_K</code> for constant).</p>

<p>A <code class="language-plaintext highlighter-rouge">BPF_RET</code> instruction tells the kernel how many bytes of the packet to copy to userspace. Returning <code class="language-plaintext highlighter-rouge">0xFFFFFFFF</code> (the maximum <code class="language-plaintext highlighter-rouge">uint32</code>) means “copy the entire packet.” Returning <code class="language-plaintext highlighter-rouge">0</code> means “copy nothing”—i.e., drop the packet.</p>

<p><code class="language-plaintext highlighter-rouge">BPF_JUMP</code> takes two skip counts: <code class="language-plaintext highlighter-rouge">jt</code> (jump true) and <code class="language-plaintext highlighter-rouge">jf</code> (jump false). A skip of 0 means “don’t skip, just execute the next instruction”—sometimes called falling through. A skip of 3 means “skip the next 3 instructions.”</p>

<p>Let’s trace through what happens for different packets:</p>

<p><strong>An ARP reply arrives.</strong> <code class="language-plaintext highlighter-rouge">BPF_LD</code> loads bytes [12:14] into <code class="language-plaintext highlighter-rouge">A</code>: <code class="language-plaintext highlighter-rouge">0x0806</code>. <code class="language-plaintext highlighter-rouge">BPF_JEQ</code> compares against <code class="language-plaintext highlighter-rouge">0x0806</code>: match, <code class="language-plaintext highlighter-rouge">jt=0</code>, so we fall through. Next <code class="language-plaintext highlighter-rouge">BPF_LD</code> loads bytes [20:22]: <code class="language-plaintext highlighter-rouge">0x0002</code>. <code class="language-plaintext highlighter-rouge">BPF_JEQ</code> compares against <code class="language-plaintext highlighter-rouge">0x0002</code>: match, fall through. <code class="language-plaintext highlighter-rouge">BPF_RET</code> returns <code class="language-plaintext highlighter-rouge">0xFFFFFFFF</code>—the kernel copies the full packet to userspace.</p>

<p><strong>An ARP request arrives.</strong> Same path through the first three instructions, but bytes [20:22] contain <code class="language-plaintext highlighter-rouge">0x0001</code> (request, not reply). <code class="language-plaintext highlighter-rouge">BPF_JEQ</code>: no match, <code class="language-plaintext highlighter-rouge">jf=1</code>, skip 1 instruction forward—past the accept—landing on <code class="language-plaintext highlighter-rouge">BPF_RET</code> returning <code class="language-plaintext highlighter-rouge">0</code>. Packet dropped. Never reaches userspace.</p>

<p><strong>An IPv4 packet arrives.</strong> <code class="language-plaintext highlighter-rouge">BPF_LD</code> loads bytes [12:14]: <code class="language-plaintext highlighter-rouge">0x0800</code>. <code class="language-plaintext highlighter-rouge">BPF_JEQ</code> against <code class="language-plaintext highlighter-rouge">0x0806</code>: no match, <code class="language-plaintext highlighter-rouge">jf=3</code>, skip 3 instructions forward, landing directly on the drop. Two instructions and it’s done. The kernel never even looks at the ARP opcode field.</p>

<p>Most traffic on a network is IPv4/IPv6, and it gets rejected after just two instructions—a load and a conditional jump. The kernel doesn’t copy a single byte to userspace for those packets.</p>

<h2 id="writing-it-in-go">Writing it in Go</h2>

<p>Go’s <code class="language-plaintext highlighter-rouge">syscall</code> package has <code class="language-plaintext highlighter-rouge">BpfStmt</code> and <code class="language-plaintext highlighter-rouge">BpfJump</code> functions for constructing BPF instructions, but they’re deprecated. The recommended replacement is <code class="language-plaintext highlighter-rouge">golang.org/x/net/bpf</code>, which provides typed instruction structs:</p>

<div class="language-go highlighter-rouge"><div class="highlight"><pre class="highlight"><code><span class="k">var</span> <span class="n">arpReplyFilter</span> <span class="o">=</span> <span class="p">[]</span><span class="n">bpf</span><span class="o">.</span><span class="n">Instruction</span><span class="p">{</span>
    <span class="n">bpf</span><span class="o">.</span><span class="n">LoadAbsolute</span><span class="p">{</span><span class="n">Off</span><span class="o">:</span> <span class="m">12</span><span class="p">,</span> <span class="n">Size</span><span class="o">:</span> <span class="m">2</span><span class="p">},</span>                          <span class="c">// BPF_LD+BPF_H+BPF_ABS  k=12</span>
    <span class="n">bpf</span><span class="o">.</span><span class="n">JumpIf</span><span class="p">{</span><span class="n">Cond</span><span class="o">:</span> <span class="n">bpf</span><span class="o">.</span><span class="n">JumpEqual</span><span class="p">,</span> <span class="n">Val</span><span class="o">:</span> <span class="m">0x0806</span><span class="p">,</span> <span class="n">SkipFalse</span><span class="o">:</span> <span class="m">3</span><span class="p">},</span> <span class="c">// BPF_JMP+BPF_JEQ+BPF_K k=0x0806 jt=0 jf=3</span>
    <span class="n">bpf</span><span class="o">.</span><span class="n">LoadAbsolute</span><span class="p">{</span><span class="n">Off</span><span class="o">:</span> <span class="m">20</span><span class="p">,</span> <span class="n">Size</span><span class="o">:</span> <span class="m">2</span><span class="p">},</span>                          <span class="c">// BPF_LD+BPF_H+BPF_ABS  k=20</span>
    <span class="n">bpf</span><span class="o">.</span><span class="n">JumpIf</span><span class="p">{</span><span class="n">Cond</span><span class="o">:</span> <span class="n">bpf</span><span class="o">.</span><span class="n">JumpEqual</span><span class="p">,</span> <span class="n">Val</span><span class="o">:</span> <span class="m">0x0002</span><span class="p">,</span> <span class="n">SkipFalse</span><span class="o">:</span> <span class="m">1</span><span class="p">},</span> <span class="c">// BPF_JMP+BPF_JEQ+BPF_K k=0x0002 jt=0 jf=1</span>
    <span class="n">bpf</span><span class="o">.</span><span class="n">RetConstant</span><span class="p">{</span><span class="n">Val</span><span class="o">:</span> <span class="m">0xFFFFFFFF</span><span class="p">},</span>                            <span class="c">// BPF_RET+BPF_K          k=0xFFFFFFFF</span>
    <span class="n">bpf</span><span class="o">.</span><span class="n">RetConstant</span><span class="p">{</span><span class="n">Val</span><span class="o">:</span> <span class="m">0</span><span class="p">},</span>                                     <span class="c">// BPF_RET+BPF_K          k=0</span>
<span class="p">}</span>
</code></pre></div></div>

<p>Each Go struct maps directly to a BPF instruction. <code class="language-plaintext highlighter-rouge">LoadAbsolute{Off: 12, Size: 2}</code> is <code class="language-plaintext highlighter-rouge">BPF_STMT(BPF_LD+BPF_H+BPF_ABS, 12)</code>—load a halfword (2 bytes) from absolute packet offset 12. <code class="language-plaintext highlighter-rouge">JumpIf{Cond: bpf.JumpEqual, Val: 0x0806, SkipFalse: 3}</code> is <code class="language-plaintext highlighter-rouge">BPF_JUMP(BPF_JMP+BPF_JEQ+BPF_K, 0x0806, 0, 3)</code>—<code class="language-plaintext highlighter-rouge">SkipFalse: 3</code> means “if not equal, skip 3 instructions forward” (landing on the final <code class="language-plaintext highlighter-rouge">BPF_RET</code> that drops the packet).</p>

<p>The <code class="language-plaintext highlighter-rouge">bpf.Assemble</code> function compiles these typed instructions into raw bytecode (<code class="language-plaintext highlighter-rouge">[]bpf.RawInstruction</code>). But here’s where it gets interesting: <code class="language-plaintext highlighter-rouge">golang.org/x/net/bpf</code> doesn’t provide a function to install the filter on a macOS BPF device. It does for Linux sockets (<code class="language-plaintext highlighter-rouge">SO_ATTACH_FILTER</code>), but the macOS <code class="language-plaintext highlighter-rouge">BIOCSETF</code> ioctl needs a <code class="language-plaintext highlighter-rouge">syscall.BpfProgram</code> struct pointing to <code class="language-plaintext highlighter-rouge">syscall.BpfInsn</code> values. Fortunately, <code class="language-plaintext highlighter-rouge">bpf.RawInstruction</code> and <code class="language-plaintext highlighter-rouge">syscall.BpfInsn</code> have identical memory layouts—both are <code class="language-plaintext highlighter-rouge">{Op uint16, Jt uint8, Jf uint8, K uint32}</code>—so an <code class="language-plaintext highlighter-rouge">unsafe.Pointer</code> cast works:</p>

<div class="language-go highlighter-rouge"><div class="highlight"><pre class="highlight"><code><span class="k">func</span> <span class="n">setBPFFilterARPReply</span><span class="p">(</span><span class="n">fd</span> <span class="kt">int</span><span class="p">)</span> <span class="kt">error</span> <span class="p">{</span>
    <span class="n">raw</span><span class="p">,</span> <span class="n">err</span> <span class="o">:=</span> <span class="n">bpf</span><span class="o">.</span><span class="n">Assemble</span><span class="p">(</span><span class="n">arpReplyFilter</span><span class="p">)</span>
    <span class="k">if</span> <span class="n">err</span> <span class="o">!=</span> <span class="no">nil</span> <span class="p">{</span>
        <span class="k">return</span> <span class="n">fmt</span><span class="o">.</span><span class="n">Errorf</span><span class="p">(</span><span class="s">"failed to assemble BPF filter: %w"</span><span class="p">,</span> <span class="n">err</span><span class="p">)</span>
    <span class="p">}</span>

    <span class="n">prog</span> <span class="o">:=</span> <span class="n">syscall</span><span class="o">.</span><span class="n">BpfProgram</span><span class="p">{</span>
        <span class="n">Len</span><span class="o">:</span>   <span class="kt">uint32</span><span class="p">(</span><span class="nb">len</span><span class="p">(</span><span class="n">raw</span><span class="p">)),</span>
        <span class="n">Insns</span><span class="o">:</span> <span class="p">(</span><span class="o">*</span><span class="n">syscall</span><span class="o">.</span><span class="n">BpfInsn</span><span class="p">)(</span><span class="n">unsafe</span><span class="o">.</span><span class="n">Pointer</span><span class="p">(</span><span class="o">&amp;</span><span class="n">raw</span><span class="p">[</span><span class="m">0</span><span class="p">])),</span>
    <span class="p">}</span>
    <span class="n">_</span><span class="p">,</span> <span class="n">_</span><span class="p">,</span> <span class="n">errno</span> <span class="o">:=</span> <span class="n">syscall</span><span class="o">.</span><span class="n">Syscall</span><span class="p">(</span>
        <span class="n">syscall</span><span class="o">.</span><span class="n">SYS_IOCTL</span><span class="p">,</span>
        <span class="kt">uintptr</span><span class="p">(</span><span class="n">fd</span><span class="p">),</span>
        <span class="n">syscall</span><span class="o">.</span><span class="n">BIOCSETF</span><span class="p">,</span>
        <span class="kt">uintptr</span><span class="p">(</span><span class="n">unsafe</span><span class="o">.</span><span class="n">Pointer</span><span class="p">(</span><span class="o">&amp;</span><span class="n">prog</span><span class="p">)),</span>
    <span class="p">)</span>
    <span class="k">if</span> <span class="n">errno</span> <span class="o">!=</span> <span class="m">0</span> <span class="p">{</span>
        <span class="k">return</span> <span class="n">fmt</span><span class="o">.</span><span class="n">Errorf</span><span class="p">(</span><span class="s">"BIOCSETF failed: %v"</span><span class="p">,</span> <span class="n">errno</span><span class="p">)</span>
    <span class="p">}</span>
    <span class="k">return</span> <span class="no">nil</span>
<span class="p">}</span>
</code></pre></div></div>

<h2 id="testing-without-hardware">Testing without hardware</h2>

<p>One of the nice things about <code class="language-plaintext highlighter-rouge">golang.org/x/net/bpf</code> is that it includes <code class="language-plaintext highlighter-rouge">bpf.NewVM</code>, a userspace BPF interpreter. You can feed it your filter program and run arbitrary byte slices through it to verify the accept/drop logic without opening any devices or network interfaces:</p>

<div class="language-go highlighter-rouge"><div class="highlight"><pre class="highlight"><code><span class="k">func</span> <span class="n">TestARPReplyFilter_DropsARPRequest</span><span class="p">(</span><span class="n">t</span> <span class="o">*</span><span class="n">testing</span><span class="o">.</span><span class="n">T</span><span class="p">)</span> <span class="p">{</span>
    <span class="n">vm</span><span class="p">,</span> <span class="n">err</span> <span class="o">:=</span> <span class="n">bpf</span><span class="o">.</span><span class="n">NewVM</span><span class="p">(</span><span class="n">arpReplyFilter</span><span class="p">)</span>
    <span class="n">require</span><span class="o">.</span><span class="n">NoError</span><span class="p">(</span><span class="n">t</span><span class="p">,</span> <span class="n">err</span><span class="p">)</span>

    <span class="n">frame</span> <span class="o">:=</span> <span class="n">buildARPRequest</span><span class="p">(</span>
        <span class="n">net</span><span class="o">.</span><span class="n">HardwareAddr</span><span class="p">{</span><span class="m">0x11</span><span class="p">,</span> <span class="m">0x22</span><span class="p">,</span> <span class="m">0x33</span><span class="p">,</span> <span class="m">0x44</span><span class="p">,</span> <span class="m">0x55</span><span class="p">,</span> <span class="m">0x66</span><span class="p">},</span>
        <span class="n">net</span><span class="o">.</span><span class="n">IP</span><span class="p">{</span><span class="m">10</span><span class="p">,</span> <span class="m">0</span><span class="p">,</span> <span class="m">0</span><span class="p">,</span> <span class="m">1</span><span class="p">},</span>
        <span class="n">net</span><span class="o">.</span><span class="n">IP</span><span class="p">{</span><span class="m">10</span><span class="p">,</span> <span class="m">0</span><span class="p">,</span> <span class="m">0</span><span class="p">,</span> <span class="m">2</span><span class="p">},</span>
    <span class="p">)</span>
    <span class="n">verdict</span><span class="p">,</span> <span class="n">err</span> <span class="o">:=</span> <span class="n">vm</span><span class="o">.</span><span class="n">Run</span><span class="p">(</span><span class="n">frame</span><span class="p">)</span>
    <span class="n">require</span><span class="o">.</span><span class="n">NoError</span><span class="p">(</span><span class="n">t</span><span class="p">,</span> <span class="n">err</span><span class="p">)</span>
    <span class="n">assert</span><span class="o">.</span><span class="n">Zero</span><span class="p">(</span><span class="n">t</span><span class="p">,</span> <span class="n">verdict</span><span class="p">,</span> <span class="s">"ARP request should be dropped"</span><span class="p">)</span>
<span class="p">}</span>
</code></pre></div></div>

<p><code class="language-plaintext highlighter-rouge">vm.Run</code> returns the number of bytes the filter would accept. Zero means drop. This makes BPF filter logic fully unit-testable—no root privileges, no network interfaces, no platform dependencies.</p>

<h2 id="the-result">The result</h2>

<p>Before the filter, with debug logging enabled to count frames:</p>

<div class="language-plaintext highlighter-rouge"><div class="highlight"><pre class="highlight"><code>Received frame: 0x0806
Received frame: 0x0800
Received frame: 0x0806
Received frame: 0x86dd
Received frame: 0x0800
...
(~10,000 frames in a few seconds)
</code></pre></div></div>

<p><code class="language-plaintext highlighter-rouge">0x0806</code> is ARP, <code class="language-plaintext highlighter-rouge">0x0800</code> is IPv4, <code class="language-plaintext highlighter-rouge">0x86dd</code> is IPv6—all mixed together, all copied to userspace.</p>

<p>After installing the filter:</p>

<div class="language-plaintext highlighter-rouge"><div class="highlight"><pre class="highlight"><code>Received frame: 0x0806
Received frame: 0x0806
...
(~100 frames in a few seconds)
</code></pre></div></div>

<p>Only <code class="language-plaintext highlighter-rouge">0x0806</code>. Only ARP replies. A <strong>~100x reduction</strong> in packets reaching userspace, achieved by six instructions running in the kernel. The CPU and memory cost of processing those extra 9,900 frames per scan cycle is simply gone.</p>

<h2 id="beyond-arp-other-things-you-can-filter">Beyond ARP: other things you can filter</h2>

<p>The same pattern applies any time you want to isolate a specific type of traffic. A BPF filter is just a sequence of field checks at fixed byte offsets — once you know the layout of the packet you’re after, writing the filter is mechanical. A few examples:</p>

<p><strong>HTTP/HTTPS traffic</strong> (custom sniffer for a specific service). Three layers: EtherType <code class="language-plaintext highlighter-rouge">0x0800</code> at offset 12, IP protocol <code class="language-plaintext highlighter-rouge">0x06</code> (TCP) at offset 23, TCP destination port at offset 36. Matching two ports requires two <code class="language-plaintext highlighter-rouge">JumpIf</code> instructions — the first jumps to accept on port 80, the second drops anything that isn’t 443:</p>

<div class="language-go highlighter-rouge"><div class="highlight"><pre class="highlight"><code><span class="k">var</span> <span class="n">httpFilter</span> <span class="o">=</span> <span class="p">[]</span><span class="n">bpf</span><span class="o">.</span><span class="n">Instruction</span><span class="p">{</span>
    <span class="n">bpf</span><span class="o">.</span><span class="n">LoadAbsolute</span><span class="p">{</span><span class="n">Off</span><span class="o">:</span> <span class="m">12</span><span class="p">,</span> <span class="n">Size</span><span class="o">:</span> <span class="m">2</span><span class="p">},</span>
    <span class="n">bpf</span><span class="o">.</span><span class="n">JumpIf</span><span class="p">{</span><span class="n">Cond</span><span class="o">:</span> <span class="n">bpf</span><span class="o">.</span><span class="n">JumpEqual</span><span class="p">,</span> <span class="n">Val</span><span class="o">:</span> <span class="m">0x0800</span><span class="p">,</span> <span class="n">SkipFalse</span><span class="o">:</span> <span class="m">6</span><span class="p">},</span> <span class="c">// IPv4?</span>
    <span class="n">bpf</span><span class="o">.</span><span class="n">LoadAbsolute</span><span class="p">{</span><span class="n">Off</span><span class="o">:</span> <span class="m">23</span><span class="p">,</span> <span class="n">Size</span><span class="o">:</span> <span class="m">1</span><span class="p">},</span>
    <span class="n">bpf</span><span class="o">.</span><span class="n">JumpIf</span><span class="p">{</span><span class="n">Cond</span><span class="o">:</span> <span class="n">bpf</span><span class="o">.</span><span class="n">JumpEqual</span><span class="p">,</span> <span class="n">Val</span><span class="o">:</span> <span class="m">0x06</span><span class="p">,</span> <span class="n">SkipFalse</span><span class="o">:</span> <span class="m">4</span><span class="p">},</span>   <span class="c">// TCP?</span>
    <span class="n">bpf</span><span class="o">.</span><span class="n">LoadAbsolute</span><span class="p">{</span><span class="n">Off</span><span class="o">:</span> <span class="m">36</span><span class="p">,</span> <span class="n">Size</span><span class="o">:</span> <span class="m">2</span><span class="p">},</span>                          <span class="c">// dst port</span>
    <span class="n">bpf</span><span class="o">.</span><span class="n">JumpIf</span><span class="p">{</span><span class="n">Cond</span><span class="o">:</span> <span class="n">bpf</span><span class="o">.</span><span class="n">JumpEqual</span><span class="p">,</span> <span class="n">Val</span><span class="o">:</span> <span class="m">80</span><span class="p">,</span> <span class="n">SkipTrue</span><span class="o">:</span> <span class="m">1</span><span class="p">},</span>      <span class="c">// port 80 → accept</span>
    <span class="n">bpf</span><span class="o">.</span><span class="n">JumpIf</span><span class="p">{</span><span class="n">Cond</span><span class="o">:</span> <span class="n">bpf</span><span class="o">.</span><span class="n">JumpEqual</span><span class="p">,</span> <span class="n">Val</span><span class="o">:</span> <span class="m">443</span><span class="p">,</span> <span class="n">SkipFalse</span><span class="o">:</span> <span class="m">1</span><span class="p">},</span>    <span class="c">// port 443 → accept</span>
    <span class="n">bpf</span><span class="o">.</span><span class="n">RetConstant</span><span class="p">{</span><span class="n">Val</span><span class="o">:</span> <span class="m">0xFFFFFFFF</span><span class="p">},</span>
    <span class="n">bpf</span><span class="o">.</span><span class="n">RetConstant</span><span class="p">{</span><span class="n">Val</span><span class="o">:</span> <span class="m">0</span><span class="p">},</span>
<span class="p">}</span>
</code></pre></div></div>

<p>This assumes a standard 20-byte IP header. It also only matches the destination port — outgoing requests. To catch responses too, add the same OR check against the source port at offset 34.</p>

<p><strong>ICMP only</strong> (ping traffic, latency tooling). Check EtherType <code class="language-plaintext highlighter-rouge">0x0800</code> at offset 12, then load the IP protocol byte at offset 23 and compare to <code class="language-plaintext highlighter-rouge">0x01</code>. Two checks — done.</p>

<p><strong>DNS</strong> (queries and replies). EtherType <code class="language-plaintext highlighter-rouge">0x0800</code> at offset 12, IP protocol <code class="language-plaintext highlighter-rouge">0x11</code> (UDP) at offset 23, then the 2-byte UDP destination port at offset 36 equal to <code class="language-plaintext highlighter-rouge">0x0035</code> (53). Three checks; everything else is gone before it reaches your code.</p>

<p><strong>DHCP</strong> (watching address assignments on a local network). Same shape as DNS — EtherType <code class="language-plaintext highlighter-rouge">0x0800</code>, UDP — but match destination port <code class="language-plaintext highlighter-rouge">0x0043</code> (67, server) or <code class="language-plaintext highlighter-rouge">0x0044</code> (68, client).</p>

<p><strong>Traffic from a specific MAC address</strong>. The source MAC sits at offsets 6–11 in the Ethernet header. Load 4 bytes at offset 6, compare to the upper 32 bits of the target MAC; load 2 bytes at offset 10, compare to the lower 16 bits. Two checks, no IP layer involved.</p>

<p>The principle is always the same: find the fixed-offset fields that uniquely identify the traffic you want, put the most common rejection first, and jump to the drop on mismatch. The kernel handles the rest.</p>

<h2 id="takeaway">Takeaway</h2>

<p>If you’re doing any kind of raw packet capture on macOS through <code class="language-plaintext highlighter-rouge">/dev/bpf*</code>, installing a filter is straightforward and the performance difference is dramatic. Six instructions, two conditional checks, and the kernel does the work for you.</p>

<p>One constraint worth knowing: classic BPF on macOS is read-only. You can observe and filter packets, but you cannot modify or inject them. If that’s a requirement, you’ll need a different approach.</p>]]></content><author><name>Nikita Vakula</name></author><category term="devops" /><category term="networking" /><category term="macos" /><category term="go" /><category term="networking" /><category term="bpf" /><category term="macos" /><category term="packet-capture" /><category term="arp" /><summary type="html"><![CDATA[How to use Berkeley Packet Filter on macOS to filter raw packets in the kernel, reducing 10,000 frames to 100 with six BPF instructions and golang.org/x/net/bpf.]]></summary></entry><entry><title type="html">Solving Keycloak Internal vs External Access in Kubernetes with hostname-backchannel-dynamic</title><link href="https://krjakbrjak.github.io/devops/2026/02/16/Solving-Keycloak-Internal-vs-External-Access-in-Kubernetes-with-hostname-backchannel-dynamic.html" rel="alternate" type="text/html" title="Solving Keycloak Internal vs External Access in Kubernetes with hostname-backchannel-dynamic" /><published>2026-02-16T00:00:00+00:00</published><updated>2026-02-16T00:00:00+00:00</updated><id>https://krjakbrjak.github.io/devops/2026/02/16/Solving%20Keycloak%20Internal%20vs%20External%20Access%20in%20Kubernetes%20with%20hostname-backchannel-dynamic</id><content type="html" xml:base="https://krjakbrjak.github.io/devops/2026/02/16/Solving-Keycloak-Internal-vs-External-Access-in-Kubernetes-with-hostname-backchannel-dynamic.html"><![CDATA[<h2 id="introduction">Introduction</h2>

<p>Using OpenID Connect (OIDC) as an authentication source is one of the best practices when working with infrastructure, as it significantly improves both security and maintainability. <a href="https://www.keycloak.org/">Keycloak</a> is an excellent open-source project widely adopted for this purpose. It supports many features and storage backends (such as PostgreSQL) and has straightforward deployment instructions on their official website.</p>

<p>However, I recently encountered an interesting challenge when deploying Keycloak in Kubernetes that required a specific configuration to solve internal service communication issues.</p>

<h2 id="the-problem-external-hostname-vs-internal-access">The Problem: External Hostname vs Internal Access</h2>
<p>When deploying Keycloak in Kubernetes, you typically specify a public hostname using the <code class="language-plaintext highlighter-rouge">--hostname=https://auth.example.com</code> parameter. This works perfectly for external clients accessing your authentication service.</p>

<p>But here’s where it gets tricky: imagine you have other services running in your Kubernetes cluster—perhaps a container registry or CI server—that need to authenticate with Keycloak. These services need to access the discovery URL at <code class="language-plaintext highlighter-rouge">https://auth.example.com/realms/{realm-name}/.well-known/openid-configuration</code> to retrieve authentication configuration.</p>

<p>The issue arises because Keycloak internally always redirects to (and generates tokens/URLs based on) the hostname that was specified during deployment. But what happens when this public URL is not resolvable by pods inside the Kubernetes cluster? This creates a problem where internal services can’t properly reach Keycloak for backchannel requests (token introspection, userinfo, etc.), even if they can reach the pod via internal DNS.</p>

<h2 id="the-solution-dynamic-backchannel-hostname">The Solution: Dynamic Backchannel Hostname</h2>
<p>Fortunately, Keycloak provides a CLI option to address this exact issue (available when the <code class="language-plaintext highlighter-rouge">hostname:v2</code> feature is enabled):</p>

<div class="language-bash highlighter-rouge"><div class="highlight"><pre class="highlight"><code><span class="nt">--features</span><span class="o">=</span><span class="nb">hostname</span>:v2
<span class="nt">--hostname-backchannel-dynamic</span><span class="o">=</span><span class="nb">true</span>
</code></pre></div></div>

<p>This configuration tells Keycloak to dynamically determine the backchannel (internal) URLs based on the incoming request, allowing access via:</p>

<ul>
  <li>Direct IP addresses</li>
  <li>Internal Kubernetes DNS (e.g., <code class="language-plaintext highlighter-rouge">keycloak.keycloak-namespace.svc.cluster.local:8080/realms/{realm-name}/.well-known/openid-configuration</code>)</li>
</ul>

<h2 id="how-it-works">How It Works</h2>
<p>With <code class="language-plaintext highlighter-rouge">--hostname-backchannel-dynamic=true</code> enabled:</p>

<ol>
  <li>External Access: Clients outside the cluster use the public hostname (<code class="language-plaintext highlighter-rouge">https://auth.example.com</code>) for authentication flows.</li>
  <li>Internal Access: Services within the cluster can use the internal Kubernetes service DNS name to communicate directly with Keycloak pods.</li>
</ol>

<p>This dual-access approach ensures that:</p>

<ul>
  <li>External clients get the proper public URL for authentication flows</li>
  <li>Internal services can reliably reach Keycloak using cluster-internal DNS resolution</li>
  <li>No complex network routing or additional ingress configuration is needed just for internal communication</li>
</ul>

<p><strong>Note for production</strong>: For this to work securely, make sure your ingress / reverse proxy correctly passes <code class="language-plaintext highlighter-rouge">Forwarded</code> or <code class="language-plaintext highlighter-rouge">X-Forwarded-*</code> headers, and consider enabling HTTPS on both external and internal access paths.</p>

<h2 id="example-configuration">Example Configuration</h2>

<p>Here’s how you might configure this in a Kubernetes deployment:</p>

<div class="language-yaml highlighter-rouge"><div class="highlight"><pre class="highlight"><code><span class="na">apiVersion</span><span class="pi">:</span> <span class="s">apps/v1</span>
<span class="na">kind</span><span class="pi">:</span> <span class="s">Deployment</span>
<span class="na">metadata</span><span class="pi">:</span>
  <span class="na">name</span><span class="pi">:</span> <span class="s">keycloak</span>
<span class="na">spec</span><span class="pi">:</span>
  <span class="na">template</span><span class="pi">:</span>
    <span class="na">spec</span><span class="pi">:</span>
      <span class="na">containers</span><span class="pi">:</span>
      <span class="pi">-</span> <span class="na">name</span><span class="pi">:</span> <span class="s">keycloak</span>
        <span class="na">image</span><span class="pi">:</span> <span class="s">quay.io/keycloak/keycloak:latest</span>
        <span class="na">args</span><span class="pi">:</span>
        <span class="pi">-</span> <span class="s">start</span>
        <span class="pi">-</span> <span class="s">--features=hostname:v2</span>           <span class="c1"># required for dynamic backchannel</span>
        <span class="pi">-</span> <span class="s">--hostname=https://auth.example.com</span>
        <span class="pi">-</span> <span class="s">--hostname-backchannel-dynamic=true</span>
        <span class="pi">-</span> <span class="s">--db=postgres</span>
        <span class="pi">-</span> <span class="s">--proxy-headers=forwarded</span>        <span class="c1"># important for correct header handling behind proxy/ingress</span>
        <span class="c1"># ... other configuration (ports, HTTPS, DB credentials via env vars, etc.)</span>
</code></pre></div></div>

<h2 id="conclusion">Conclusion</h2>

<p>The –hostname-backchannel-dynamic=true flag (combined with the hostname:v2 feature) is a simple yet powerful solution for mixed internal/external access scenarios in Kubernetes. While the public URL remains ideal for external client access, internal service-to-service communication often requires this flexibility.</p>

<p>Keycloak’s hostname configuration options make it a robust choice for authentication infrastructure in containerized environments.</p>

<h2 id="references">References</h2>

<ul>
  <li><a href="https://www.keycloak.org/documentation">Keycloak Official Documentation</a></li>
  <li><a href="https://www.keycloak.org/server/hostname">Keycloak Server Configuration</a></li>
</ul>]]></content><author><name>Nikita Vakula</name></author><category term="devops" /><category term="keycloak" /><category term="kubernetes" /><category term="networking" /><category term="authentication" /><summary type="html"><![CDATA[Introduction]]></summary></entry><entry><title type="html">Building a Simple DNS Forwarder for VMs in Go</title><link href="https://krjakbrjak.github.io/devops/dns/virtualization/2026/01/30/Simple-DNS-forwarder.html" rel="alternate" type="text/html" title="Building a Simple DNS Forwarder for VMs in Go" /><published>2026-01-30T00:00:00+00:00</published><updated>2026-01-30T00:00:00+00:00</updated><id>https://krjakbrjak.github.io/devops/dns/virtualization/2026/01/30/Simple%20DNS%20forwarder</id><content type="html" xml:base="https://krjakbrjak.github.io/devops/dns/virtualization/2026/01/30/Simple-DNS-forwarder.html"><![CDATA[<p>Learn how to build a smart DNS forwarder in Go for QEMU VMs managed by qcontroller. Automatically sync host DNS (including VPN changes) using fsnotify, miekg/dns, and CoreDHCP — without touching running guest configurations.</p>

<h2 id="introduction-why-dns-just-works--until-it-doesnt">Introduction: Why DNS “Just Works” … Until It Doesn’t</h2>

<p>On modern Linux systems, systemd-resolved handles DNS resolution transparently — you rarely need to think about it. It simply works.
But when managing QEMU-based virtual machines with <a href="https://github.com/q-controller/qcontroller">qcontroller</a>, things get more interesting. <code class="language-plaintext highlighter-rouge">qcontroller</code> supports two main ways to configure networking and DNS for VM instances:</p>

<ul>
  <li><strong>DHCP (default fallback)</strong></li>
  <li><strong>Cloud-Init network configuration</strong></li>
</ul>

<p>When Cloud-Init’s network config is not used, it falls back to DHCP. As explained in <a href="/devops/networking/virtualization/2025/11/29/Network-Namespaces-Isolating-VM-Networking.html">the previous post</a>, qcontroller runs the QEMU process inside a dedicated network namespace connected to the host’s root namespace via a veth pair.
This namespace isolation is powerful: port 53 (DNS) is free inside the namespace, so we can run our own DHCP and DNS services without conflicts.
For DHCP, I use the excellent, modular <a href="https://github.com/coredhcp/coredhcp">CoreDHCP</a> server — embedded and running in a separate goroutine. One of its key configuration fields is the DNS server IP (DHCP clients always query DNS on port 53). I simply pass the nameserver IPs from the QEMU subcommand configuration:</p>
<div class="language-json highlighter-rouge"><div class="highlight"><pre class="highlight"><code><span class="w">    </span><span class="nl">"linuxSettings"</span><span class="p">:</span><span class="w"> </span><span class="p">{</span><span class="w">
        </span><span class="nl">"network"</span><span class="p">:</span><span class="w"> </span><span class="p">{</span><span class="w">
            </span><span class="nl">"name"</span><span class="p">:</span><span class="w"> </span><span class="s2">"br0"</span><span class="p">,</span><span class="w">
            </span><span class="nl">"gateway_ip"</span><span class="p">:</span><span class="w"> </span><span class="s2">"192.168.71.1/24"</span><span class="p">,</span><span class="w">
            </span><span class="nl">"bridge_ip"</span><span class="p">:</span><span class="w"> </span><span class="s2">"192.168.71.3/24"</span><span class="p">,</span><span class="w">
            </span><span class="nl">"dhcp"</span><span class="p">:</span><span class="w"> </span><span class="p">{</span><span class="w">
                </span><span class="nl">"start"</span><span class="p">:</span><span class="w"> </span><span class="s2">"192.168.71.4/24"</span><span class="p">,</span><span class="w">
                </span><span class="nl">"end"</span><span class="p">:</span><span class="w"> </span><span class="s2">"192.168.71.254/24"</span><span class="p">,</span><span class="w">
                </span><span class="nl">"lease_time"</span><span class="p">:</span><span class="w"> </span><span class="mi">86400</span><span class="p">,</span><span class="w">
                </span><span class="nl">"dns"</span><span class="p">:</span><span class="w"> </span><span class="p">[</span><span class="s2">"8.8.8.8"</span><span class="p">,</span><span class="w"> </span><span class="s2">"8.8.4.4"</span><span class="p">],</span><span class="w">
                </span><span class="nl">"lease_file"</span><span class="p">:</span><span class="w"> </span><span class="s2">"./build/run/qcontroller-dhcp-leases"</span><span class="w">
            </span><span class="p">},</span><span class="w">
            </span><span class="nl">"start_dns"</span><span class="p">:</span><span class="w"> </span><span class="kc">true</span><span class="w">
        </span><span class="p">}</span><span class="w">
    </span><span class="p">}</span><span class="w">
</span></code></pre></div></div>

<p>This configuration will start the internal DNS server and use the IPs specified in the <code class="language-plaintext highlighter-rouge">dns</code> field as fallback DNS resolvers.</p>

<p>When static IPs are preferred, you can provide Cloud-Init network config with dedicated nameservers. This setup is reliable: start the VM, and everything configures itself automatically.
I thought my work was done — until I connected the host to a VPN. Suddenly, DNS resolution for resources in the VPN subnet stopped working inside the VMs.</p>

<h2 id="the-two-core-problems">The Two Core Problems</h2>

<ol>
  <li><strong>Detecting host DNS changes (e.g., new VPN nameservers added to the host)</strong></li>
  <li><strong>Propagating those changes to running VMs without disrupting or compromising guest services</strong></li>
</ol>

<p>Touching running VMs directly is dangerous — a mistake could break critical services. We need a safer approach.</p>

<h3 id="solution-part-1-detecting-host-dns-changes-reliably">Solution Part 1: Detecting Host DNS Changes Reliably</h3>

<p>On Linux, nameservers are traditionally listed in <code class="language-plaintext highlighter-rouge">/etc/resolv.conf</code>. But on <code class="language-plaintext highlighter-rouge">systemd</code>-based systems, <code class="language-plaintext highlighter-rouge">/etc/resolv.conf</code> is usually a symlink to a stub file pointing to <code class="language-plaintext highlighter-rouge">127.0.0.53</code> (<code class="language-plaintext highlighter-rouge">systemd-resolved</code>’s local resolver). The real upstream servers are managed elsewhere.</p>

<p>The correct location is:</p>

<ul>
  <li><code class="language-plaintext highlighter-rouge">/run/systemd/resolve/resolv.conf</code> (on systemd systems)</li>
  <li><code class="language-plaintext highlighter-rouge">/etc/resolv.conf</code> (fallback for non-systemd setups)</li>
</ul>

<p>Because <code class="language-plaintext highlighter-rouge">qcontroller</code> runs in a separate network namespace, we can still access these host files via the namespace setup.
Polling the file works but wastes resources. Better: <em>watch for changes using filesystem notifications</em>.
In Go, the battle-tested <a href="https://github.com/fsnotify/fsnotify">fsnotify</a> library handles this perfectly. For maximum reliability (especially with systemd’s atomic renames), watch the parent directory (<code class="language-plaintext highlighter-rouge">/run/systemd/resolve/</code> or <code class="language-plaintext highlighter-rouge">/etc/</code>) instead of the file itself. This captures creates, removes, and modifications cleanly.</p>

<h3 id="solution-part-2-parsing-resolvconf-without-reinventing-the-wheel">Solution Part 2: Parsing resolv.conf Without Reinventing the Wheel</h3>

<p>Once a change is detected, parse the file to extract upstream servers.
Parsing <code class="language-plaintext highlighter-rouge">resolv.conf</code> manually is doable but error-prone and best avoided. Instead, use the mature <a href="https://github.com/miekg/dns">miekg/dns</a> library — the de-facto standard DNS toolkit in Go. It includes built-in parsers:</p>

<div class="language-go highlighter-rouge"><div class="highlight"><pre class="highlight"><code><span class="k">import</span> <span class="s">"github.com/miekg/dns"</span>

<span class="n">upstreams</span> <span class="o">:=</span> <span class="p">[]</span><span class="kt">string</span><span class="p">{}</span>
<span class="n">cfg</span><span class="p">,</span> <span class="n">cfgErr</span> <span class="o">:=</span> <span class="n">dns</span><span class="o">.</span><span class="n">ClientConfigFromFile</span><span class="p">(</span><span class="s">"/run/systemd/resolve/resolv.conf"</span><span class="p">)</span>
<span class="k">if</span> <span class="n">cfgErr</span> <span class="o">!=</span> <span class="no">nil</span> <span class="p">{</span>
    <span class="c">// fallback to /etc/resolv.conf</span>
    <span class="n">cfg</span><span class="p">,</span> <span class="n">cfgErr</span> <span class="o">=</span> <span class="n">dns</span><span class="o">.</span><span class="n">ClientConfigFromFile</span><span class="p">(</span><span class="s">"/etc/resolv.conf"</span><span class="p">)</span>
<span class="p">}</span>

<span class="k">if</span> <span class="n">cfgErr</span> <span class="o">==</span> <span class="no">nil</span> <span class="p">{</span>
  <span class="k">for</span> <span class="n">_</span><span class="p">,</span> <span class="n">server</span> <span class="o">:=</span> <span class="k">range</span> <span class="n">cfg</span><span class="o">.</span><span class="n">Servers</span> <span class="p">{</span>
    <span class="n">upstreams</span> <span class="o">=</span> <span class="nb">append</span><span class="p">(</span><span class="n">upstreams</span><span class="p">,</span> <span class="n">net</span><span class="o">.</span><span class="n">JoinHostPort</span><span class="p">(</span><span class="n">server</span><span class="p">,</span> <span class="n">cfg</span><span class="o">.</span><span class="n">Port</span><span class="p">))</span>
  <span class="p">}</span>
<span class="p">}</span>

<span class="c">// upstreams now contains the upstream addresses</span>
</code></pre></div></div>

<p>With <em>fsnotify</em> + <em>miekg/dns</em>, we reliably detect and load updated upstreams from the host.</p>

<h3 id="solution-part-3-static-dns-in-vms--smart-forwarding">Solution Part 3: Static DNS in VMs + Smart Forwarding</h3>

<p>Instead of dynamically reconfiguring VMs (risky!), give every VM a single, static DNS resolver IP — the address of our embedded DNS server inside the namespace.
But how can one static resolver handle host DNS changes (VPNs, etc.)?
Enter a <strong>custom DNS forwarder</strong>:</p>

<ul>
  <li>Listens on port 53 in the VM namespace</li>
  <li>Forwards queries sequentially to the current upstream list (from host <code class="language-plaintext highlighter-rouge">resolv.conf</code>)</li>
  <li>Returns immediately on the first positive response (NOERROR + answers &gt; 0)</li>
  <li>Otherwise continues to the next upstream</li>
  <li>Falls back to the last negative response (e.g. NXDOMAIN or NODATA)</li>
  <li>Returns SERVFAIL only if all upstreams fail completely (network errors)</li>
</ul>

<p>This “optimistic fallback until positive” logic is simple yet powerful — it mirrors real-world needs like <strong>VPN + public DNS chaining</strong>.
The full implementation lives in <code class="language-plaintext highlighter-rouge">qcontroller</code> — see the <a href="https://github.com/q-controller/qcontroller/pull/24">latest changes</a>.</p>

<h2 id="fallback-for-resilience">Fallback for Resilience</h2>

<p>What happens if <code class="language-plaintext highlighter-rouge">qcontroller</code> crashes (hopefully not the case!) or stops? VMs keep running, but DNS updates from the host stop.
To handle this gracefully, configure a fallback nameserver list in the QEMU config (e.g., <code class="language-plaintext highlighter-rouge">8.8.8.8</code>, <code class="language-plaintext highlighter-rouge">1.1.1.1</code>, <code class="language-plaintext highlighter-rouge">9.9.9.9</code>). VMs then fall back to public DNS — not ideal for internal/VPN resources, but better than total failure.</p>

<h2 id="conclusion">Conclusion</h2>

<p>With this setup:</p>

<ul>
  <li>VMs always use a single, static DNS IP</li>
  <li>The embedded forwarder dynamically follows host DNS changes (including VPN connections)</li>
  <li>No guest reconfiguration needed → zero risk to running services</li>
  <li>Reliable detection via <strong>fsnotify</strong> + robust parsing via <strong>miekg/dns</strong></li>
  <li>Graceful fallback via configurable public resolvers</li>
</ul>

<p>Your VMs now have the exact same network connectivity as the host root namespace — <strong>automatically</strong>.</p>

<p>Enjoy hassle-free DNS in your VM fleet!</p>]]></content><author><name>Nikita Vakula</name></author><category term="devops" /><category term="dns" /><category term="virtualization" /><category term="go" /><category term="networking" /><category term="dns" /><summary type="html"><![CDATA[]]></summary></entry><entry><title type="html">From Swagger UI to React: Building qcontroller’s Frontend</title><link href="https://krjakbrjak.github.io/devops/frontend/virtualization/2026/01/08/From-Swagger-UI-to-React-Building-qcontroller's-Frontend.html" rel="alternate" type="text/html" title="From Swagger UI to React: Building qcontroller’s Frontend" /><published>2026-01-08T00:00:00+00:00</published><updated>2026-01-08T00:00:00+00:00</updated><id>https://krjakbrjak.github.io/devops/frontend/virtualization/2026/01/08/From%20Swagger%20UI%20to%20React:%20Building%20qcontroller&apos;s%20Frontend</id><content type="html" xml:base="https://krjakbrjak.github.io/devops/frontend/virtualization/2026/01/08/From-Swagger-UI-to-React-Building-qcontroller&apos;s-Frontend.html"><![CDATA[<p>In previous articles, I introduced <a href="https://github.com/q-controller/qcontroller">qcontroller</a>, a powerful tool for managing the complete lifecycle of QEMU VM instances—creating, starting, stopping, and removing VMs with database-like operations.</p>

<p>While qcontroller’s REST API worked well for automation, and Swagger UI provided basic interaction capabilities, the growing adoption revealed a critical pain point: managing VMs through Swagger UI was becoming increasingly tedious for daily operations. What started as a backend-focused project clearly needed a proper frontend.</p>

<p>I built the <a href="https://github.com/q-controller/qcontroller-ui">qcontroller UI</a>—a React-based web interface that transforms VM management from a technical chore into an intuitive experience. After spending considerable time on infrastructure and backend development, returning to frontend work was a refreshing change that reminded me why I love building user-facing applications.</p>

<h2 id="tldr">TL;DR</h2>

<p>Built a React frontend for qcontroller to replace cumbersome Swagger UI. Key highlights:</p>

<ul>
  <li><strong>Tech stack</strong>: React + TypeScript + Mantine + Vite for modern, maintainable development</li>
  <li><strong>Real-time updates</strong>: WebSocket integration for live VM status changes and IP allocation</li>
  <li><strong>Code generation</strong>: OpenAPI Generator for REST client + Protocol Buffers for WebSocket messages</li>
  <li><strong>Single binary distribution</strong>: Go’s <code class="language-plaintext highlighter-rouge">embed</code> directive bundles the entire React app into the executable</li>
  <li><strong>Result</strong>: Users download one file and get both API and web interface with zero setup</li>
</ul>

<p align="center">
  <img src="/images/posts/From Swagger UI to React: Building qcontroller's Frontend/dashboard.png" alt="Simple dashboard" />
</p>

<h2 id="the-challenge-beyond-basic-crud-operations">The Challenge: Beyond Basic CRUD Operations</h2>

<p>The UI requirements seemed straightforward at first glance, but the devil was in the details. VM management operations naturally split into two domains:</p>

<p><strong>VM Image Management:</strong></p>
<ul>
  <li>Upload custom VM images (crucial for development workflows)</li>
  <li>List available images with metadata</li>
  <li>Remove unused images to save storage</li>
</ul>

<p><strong>VM Instance Lifecycle:</strong></p>
<ul>
  <li>Create instances with complex configuration options</li>
  <li>Start, stop, and delete VMs</li>
  <li>Monitor real-time status changes</li>
  <li>Track resource allocation (IP addresses, ports, etc.)</li>
</ul>

<p>The real complexity emerged from the parameters involved. Creating a VM isn’t just clicking “start”—it involves networking configurations, resource allocation, storage options, and more. Each operation needed a thoughtful UI that could handle this complexity without overwhelming users.</p>

<h2 id="the-game-changer-real-time-updates">The Game Changer: Real-Time Updates</h2>

<p>The most critical missing piece was live feedback. In the Swagger UI world, you’d make a request and manually refresh to see status changes. But VM operations are inherently asynchronous—starting a VM takes time, IP allocation happens dynamically, and status changes occur continuously.</p>

<p>This drove me to implement WebSocket-based event streaming in qcontroller itself. Now the UI could show real-time updates as VMs boot up, IP addresses get assigned, and operations complete. This single feature transformed the user experience from static and frustrating to dynamic and responsive.</p>

<h2 id="tech-stack-decisions-modern-tools-for-modern-problems">Tech Stack Decisions: Modern Tools for Modern Problems</h2>

<p>Choosing the right frontend stack was crucial for both development speed and long-term maintainability.</p>

<p><strong><a href="https://react.dev/">React</a> + TypeScript</strong>: The obvious choice for component-based UI development. React’s virtual DOM model and extensive ecosystem made it perfect for building dynamic interfaces.</p>

<p><strong><a href="https://mantine.dev/">Mantine</a></strong>: After evaluating several component libraries, Mantine stood out for its high-quality, responsive components and excellent developer experience. Every component looked professional out of the box—crucial for a developer tool that needed to feel polished.</p>

<p><strong><a href="https://vitejs.dev/">Vite</a></strong>: Modern build tooling that feels lightning-fast compared to Webpack. The development server starts instantly, and hot module replacement actually works reliably.</p>

<p>The real elegance came from React’s Context API for handling WebSocket connections. Instead of prop drilling or complex state management, the entire app could reactively update from a single WebSocket stream:</p>

<div class="language-ts highlighter-rouge"><div class="highlight"><pre class="highlight"><code><span class="k">import</span> <span class="p">{</span> <span class="nx">useEffect</span><span class="p">,</span> <span class="nx">useState</span> <span class="p">}</span> <span class="k">from</span> <span class="dl">'</span><span class="s1">react</span><span class="dl">'</span><span class="p">;</span>
<span class="k">import</span> <span class="p">{</span> <span class="nx">UpdatesContext</span> <span class="p">}</span> <span class="k">from</span> <span class="dl">'</span><span class="s1">@/common/updates-context</span><span class="dl">'</span><span class="p">;</span>

<span class="k">export</span> <span class="kd">function</span> <span class="nx">UpdatesProvider</span><span class="p">({</span> <span class="nx">children</span><span class="p">,</span> <span class="nx">wsUrl</span> <span class="p">})</span> <span class="p">{</span>
  <span class="kd">const</span> <span class="p">[</span><span class="nx">data</span><span class="p">,</span> <span class="nx">setData</span><span class="p">]</span> <span class="o">=</span> <span class="nx">useState</span><span class="p">(</span><span class="kc">null</span><span class="p">);</span>

  <span class="nx">useEffect</span><span class="p">(()</span> <span class="o">=&gt;</span> <span class="p">{</span>
    <span class="kd">const</span> <span class="nx">ws</span> <span class="o">=</span> <span class="k">new</span> <span class="nx">WebSocket</span><span class="p">(</span><span class="nx">wsUrl</span><span class="p">);</span>
    <span class="nx">ws</span><span class="p">.</span><span class="nx">binaryType</span> <span class="o">=</span> <span class="dl">'</span><span class="s1">arraybuffer</span><span class="dl">'</span><span class="p">;</span>

    <span class="nx">ws</span><span class="p">.</span><span class="nx">onopen</span> <span class="o">=</span> <span class="p">()</span> <span class="o">=&gt;</span> <span class="p">{</span>
      <span class="c1">// Implementation</span>
    <span class="p">};</span>

    <span class="nx">ws</span><span class="p">.</span><span class="nx">onmessage</span> <span class="o">=</span> <span class="p">(</span><span class="nx">event</span><span class="p">)</span> <span class="o">=&gt;</span> <span class="p">{</span>
      <span class="c1">// Implementation</span>
    <span class="p">};</span>

    <span class="k">return</span> <span class="p">()</span> <span class="o">=&gt;</span> <span class="p">{</span>
      <span class="k">if</span> <span class="p">(</span><span class="nx">ws</span><span class="p">.</span><span class="nx">readyState</span> <span class="o">===</span> <span class="nx">WebSocket</span><span class="p">.</span><span class="nx">OPEN</span><span class="p">)</span> <span class="p">{</span>
        <span class="nx">ws</span><span class="p">.</span><span class="nx">close</span><span class="p">();</span>
      <span class="p">}</span>
    <span class="p">};</span>
  <span class="p">},</span> <span class="p">[</span><span class="nx">wsUrl</span><span class="p">]);</span>

  <span class="k">return</span> <span class="p">(</span>
    <span class="o">&lt;</span><span class="nx">UpdatesContext</span><span class="p">.</span><span class="nx">Provider</span> <span class="nx">value</span><span class="o">=</span><span class="p">{</span><span class="nx">data</span><span class="p">}</span><span class="o">&gt;</span><span class="p">{</span><span class="nx">children</span><span class="p">}</span><span class="o">&lt;</span><span class="sr">/UpdatesContext.Provider</span><span class="err">&gt;
</span>  <span class="p">);</span>
<span class="p">}</span>
</code></pre></div></div>

<p>And then, in your app entry point:</p>

<div class="language-ts highlighter-rouge"><div class="highlight"><pre class="highlight"><code><span class="k">import</span> <span class="nx">React</span> <span class="k">from</span> <span class="dl">'</span><span class="s1">react</span><span class="dl">'</span><span class="p">;</span>
<span class="k">import</span> <span class="nx">ReactDOM</span> <span class="k">from</span> <span class="dl">'</span><span class="s1">react-dom/client</span><span class="dl">'</span><span class="p">;</span>
<span class="k">import</span> <span class="p">{</span> <span class="nx">UpdatesProvider</span> <span class="p">}</span> <span class="k">from</span> <span class="dl">'</span><span class="s1">@/common/updates-provider</span><span class="dl">'</span><span class="p">;</span>

<span class="nx">ReactDOM</span><span class="p">.</span><span class="nx">createRoot</span><span class="p">(</span><span class="nb">document</span><span class="p">.</span><span class="nx">getElementById</span><span class="p">(</span><span class="dl">'</span><span class="s1">root</span><span class="dl">'</span><span class="p">)</span><span class="o">!</span><span class="p">).</span><span class="nx">render</span><span class="p">(</span>
  <span class="o">&lt;</span><span class="nx">React</span><span class="p">.</span><span class="nx">StrictMode</span><span class="o">&gt;</span>
    <span class="o">&lt;</span><span class="nx">UpdatesProvider</span> <span class="nx">wsUrl</span><span class="o">=</span><span class="dl">"</span><span class="s2">/ws</span><span class="dl">"</span><span class="o">&gt;</span>
      <span class="p">{</span><span class="cm">/* App content */</span><span class="p">}</span>
    <span class="o">&lt;</span><span class="sr">/UpdatesProvider</span><span class="err">&gt;
</span>  <span class="o">&lt;</span><span class="sr">/React.StrictMode</span><span class="err">&gt;
</span><span class="p">);</span>
</code></pre></div></div>

<h2 id="code-generation-the-api-first-approach">Code Generation: The API-First Approach</h2>

<p>For the REST API communication, I leveraged <a href="https://openapi-generator.tech/">OpenAPI Generator</a> to automatically generate TypeScript client code. This API-first approach eliminates the common frontend-backend synchronization problems and ensures type safety across the entire stack.</p>

<p>The async nature of VM operations presented an interesting challenge. While OpenAPI excels at describing synchronous REST operations, there’s no standard way to describe WebSocket-based event streams. <a href="https://www.asyncapi.com/">AsyncAPI</a> exists but didn’t fit my specific needs, and I wanted to avoid the complexity of gRPC-Web proxies.</p>

<p>The solution was surprisingly elegant: using Protocol Buffers for WebSocket messages. With <a href="https://github.com/stephenh/ts-proto">ts-proto</a>, the WebSocket message handling became as type-safe as the REST API, with everything generated from <code class="language-plaintext highlighter-rouge">.proto</code> definitions. Only a few lines of WebSocket connection code needed to be written manually—the rest was generated and type-safe.</p>

<h2 id="the-deployment-game-changer-single-binary-with-embedded-ui">The Deployment Game-Changer: Single Binary with Embedded UI</h2>

<p>One of the most compelling aspects of this project turned out to be the deployment strategy. For qcontroller’s specific use case—a tool that gets distributed as a standalone binary—this approach was a perfect match.</p>

<p>qcontroller is written in Go, which already provides excellent deployment characteristics: compile once, run anywhere, no runtime dependencies. Since the tool is designed to be downloaded and run directly by users, maintaining that simplicity was crucial. But how do you include a modern React application without breaking this elegant distribution model?</p>

<p>For most web applications, you’d have separate frontend and backend deployments, CDNs for static assets, or containerized solutions. But qcontroller needed to stay true to its “single binary” philosophy for easy adoption and maintenance.</p>

<p>Go’s <a href="https://golang.org/pkg/embed/"><code class="language-plaintext highlighter-rouge">embed</code></a> directive provided the perfect solution for this specific requirement—the entire React build becomes part of the binary itself:</p>

<div class="language-go highlighter-rouge"><div class="highlight"><pre class="highlight"><code><span class="k">package</span> <span class="n">frontend</span>

<span class="k">import</span> <span class="p">(</span>
  <span class="s">"embed"</span>
  <span class="s">"net/http"</span>
<span class="p">)</span>

<span class="c">//go:embed generated/*</span>
<span class="k">var</span> <span class="n">webFS</span> <span class="n">embed</span><span class="o">.</span><span class="n">FS</span>

<span class="k">func</span> <span class="n">Handler</span><span class="p">(</span><span class="n">basepath</span> <span class="kt">string</span><span class="p">)</span> <span class="n">http</span><span class="o">.</span><span class="n">HandlerFunc</span> <span class="p">{</span>
  <span class="k">return</span> <span class="k">func</span><span class="p">(</span><span class="n">w</span> <span class="n">http</span><span class="o">.</span><span class="n">ResponseWriter</span><span class="p">,</span> <span class="n">r</span> <span class="o">*</span><span class="n">http</span><span class="o">.</span><span class="n">Request</span><span class="p">)</span> <span class="p">{</span>
    <span class="n">path</span> <span class="o">:=</span> <span class="s">"generated/"</span> <span class="o">+</span> <span class="n">r</span><span class="o">.</span><span class="n">URL</span><span class="o">.</span><span class="n">Path</span><span class="p">[</span><span class="nb">len</span><span class="p">(</span><span class="n">basepath</span><span class="p">)</span><span class="o">:</span><span class="p">]</span>
    <span class="k">if</span> <span class="n">_</span><span class="p">,</span> <span class="n">err</span> <span class="o">:=</span> <span class="n">webFS</span><span class="o">.</span><span class="n">Open</span><span class="p">(</span><span class="n">path</span><span class="p">);</span> <span class="n">err</span> <span class="o">!=</span> <span class="no">nil</span> <span class="p">{</span>
      <span class="c">// Serve index.html for client-side routing</span>
      <span class="n">http</span><span class="o">.</span><span class="n">ServeFileFS</span><span class="p">(</span><span class="n">w</span><span class="p">,</span> <span class="n">r</span><span class="p">,</span> <span class="n">webFS</span><span class="p">,</span> <span class="s">"generated/index.html"</span><span class="p">)</span>
      <span class="k">return</span>
    <span class="p">}</span>
    <span class="n">http</span><span class="o">.</span><span class="n">ServeFileFS</span><span class="p">(</span><span class="n">w</span><span class="p">,</span> <span class="n">r</span><span class="p">,</span> <span class="n">webFS</span><span class="p">,</span> <span class="n">path</span><span class="p">)</span>
  <span class="p">}</span>
<span class="p">}</span>
</code></pre></div></div>

<p>For qcontroller’s distribution model, this delivers exactly what’s needed: users download one binary, run it, and immediately get both the API and UI. No configuration files, no separate setup steps, no version mismatches between frontend and backend components.</p>

<p>The maintenance benefits are significant too. There’s no need to coordinate releases between multiple services, no asset versioning concerns, and no deployment complexity. Users always get a perfectly matched frontend and backend in a single download.</p>

<h2 id="results-from-functional-to-delightful">Results: From Functional to Delightful</h2>

<p>The transformation from Swagger UI to a custom React interface has been remarkable. What was once a series of API calls requiring manual status checks is now an intuitive dashboard with real-time updates. VM creation involves guided forms instead of raw JSON, and operations provide immediate visual feedback.</p>

<p>The development experience reinforced something I’ve always believed: when you choose the right tools, frontend development can be just as systematic and maintainable as backend work. The combination of TypeScript, code generation, and well-designed component libraries created a development workflow that felt as robust as my usual Go projects.</p>

<p>The qcontroller UI proves that developer tools don’t have to sacrifice usability for power. With the right architecture and toolchain, you can build interfaces that are both technically sophisticated and genuinely pleasant to use.</p>]]></content><author><name>Nikita Vakula</name></author><category term="devops" /><category term="frontend" /><category term="virtualization" /><category term="react" /><category term="typescript" /><category term="websockets" /><category term="go" /><category term="ui" /><summary type="html"><![CDATA[In previous articles, I introduced qcontroller, a powerful tool for managing the complete lifecycle of QEMU VM instances—creating, starting, stopping, and removing VMs with database-like operations.]]></summary></entry><entry><title type="html">Network Namespaces: Isolating VM Networking</title><link href="https://krjakbrjak.github.io/devops/networking/virtualization/2025/11/29/Network-Namespaces-Isolating-VM-Networking.html" rel="alternate" type="text/html" title="Network Namespaces: Isolating VM Networking" /><published>2025-11-29T00:00:00+00:00</published><updated>2025-11-29T00:00:00+00:00</updated><id>https://krjakbrjak.github.io/devops/networking/virtualization/2025/11/29/Network%20Namespaces:%20Isolating%20VM%20Networking</id><content type="html" xml:base="https://krjakbrjak.github.io/devops/networking/virtualization/2025/11/29/Network-Namespaces-Isolating-VM-Networking.html"><![CDATA[<p>In my previous articles, I discussed various networking approaches for Linux virtualization. I developed <a href="https://github.com/q-controller/qcontroller">qcontroller</a>, a tool responsible for managing the complete lifecycle of QEMU VM instances—creating, starting, stopping, and removing VMs with database-like operations.</p>

<p>Since modern VMs typically require internet access and inter-VM communication, qcontroller also manages firewall settings using nftables rules. The original networking scheme involved creating bridges, configuring nftables chains, and establishing rules to allow traffic flow between the internet, VMs, and host system. Each VM connects through a TAP device that uses the bridge as its master interface.</p>

<p>While this approach works well, it has a significant drawback: all networking components—bridges, TAP devices, and nftables rules—exist within the host’s network stack. This “pollution” of the host networking requires careful cleanup to avoid breaking the host system when removing VMs. Each interface and rule must be individually and properly removed.</p>

<p>I prefer solutions where removing a single component automatically cleans up everything else. Fortunately, Linux provides exactly this capability through <strong>network namespaces</strong>. Let’s explore how network namespaces can help build a cleaner, more isolated solution for managing VM networking.</p>

<h2 id="what-are-network-namespaces">What are Network Namespaces?</h2>

<p>Most developers familiar with Docker have encountered the concept of <a href="https://en.wikipedia.org/wiki/Linux_namespaces">namespaces</a>, particularly network namespaces. This Linux kernel feature allows you to create isolated network stacks on the same physical host, each appearing as a completely separate network environment. According to the <a href="https://man7.org/linux/man-pages/man7/network_namespaces.7.html">Linux manual pages</a>:</p>

<blockquote>
  <p>Network namespaces provide isolation of the system resources associated with networking: network devices, IPv4 and IPv6 protocol stacks, IP routing tables, firewall rules, the /proc/net directory (which is a symbolic link to /proc/pid/net), the /sys/class/net directory, various files under /proc/sys/net, port numbers (sockets), and so on. In addition, network namespaces isolate the UNIX domain abstract socket namespace (see unix(7)).</p>
</blockquote>

<p>This is exactly what we need—a completely separate network stack with its own devices, routing tables, and firewall rules. However, when you create a new network namespace, it starts empty with no network devices. So how do we connect it to the internet? <a href="https://man7.org/linux/man-pages/man7/network_namespaces.7.html">The Linux manual</a> explains the solution:</p>

<blockquote>
  <p>A virtual network (veth(4)) device pair provides a pipe-like abstraction that can be used to create tunnels between network namespaces, and can be used to create a bridge to a physical network device in another namespace. When a namespace is freed, the veth(4) devices that it contains are destroyed.</p>
</blockquote>

<p>The key insight here is the automatic cleanup: when a namespace is deleted, all its contained veth devices are automatically destroyed—exactly the behavior we want!</p>

<p align="center">
  <img src="/images/posts/Network Namespaces: Isolating VM Networking/namespaces.svg" alt="Network namespace" />
</p>

<h2 id="creating-and-configuring-a-network-namespace">Creating and Configuring a Network Namespace</h2>

<p>Since our host network stack has internet connectivity, we need to connect our new namespace to the host network using a veth pair (which acts like a virtual ethernet cable). For the pair to communicate, both ends need IP addresses. Here are the commands to set this up:</p>

<div class="language-shell highlighter-rouge"><div class="highlight"><pre class="highlight"><code><span class="c"># Create a new network namespace called 'example'</span>
<span class="nb">sudo </span>ip netns add example

<span class="c"># Create a veth pair (virtual ethernet cable)</span>
<span class="nb">sudo </span>ip <span class="nb">link </span>add host-veth <span class="nb">type </span>veth peer name example-veth

<span class="c"># Move one end of the veth pair into the new namespace</span>
<span class="c"># (initially both ends exist in the host namespace)</span>
<span class="nb">sudo </span>ip <span class="nb">link set </span>example-veth netns example

<span class="c"># Assign IP addresses to both ends of the veth pair</span>
<span class="nb">sudo </span>ip addr add 192.168.26.1/24 dev host-veth              <span class="c"># Host end</span>
<span class="nb">sudo </span>ip netns <span class="nb">exec </span>example ip addr add 192.168.26.2/24 dev example-veth  <span class="c"># Namespace end</span>

<span class="c"># Bring both interfaces up</span>
<span class="nb">sudo </span>ip <span class="nb">link set </span>dev host-veth up
<span class="nb">sudo </span>ip netns <span class="nb">exec </span>example ip <span class="nb">link set </span>dev example-veth up
</code></pre></div></div>

<p>After executing these commands, we have successfully configured a new network namespace and connected it to the host namespace via a veth pair. Let’s test the connectivity with <code class="language-plaintext highlighter-rouge">ip netns exec example ping 192.168.26.1</code>:</p>

<div class="language-shell highlighter-rouge"><div class="highlight"><pre class="highlight"><code>PING 192.168.26.1 <span class="o">(</span>192.168.26.1<span class="o">)</span> 56<span class="o">(</span>84<span class="o">)</span> bytes of data.
64 bytes from 192.168.26.1: <span class="nv">icmp_seq</span><span class="o">=</span>1 <span class="nv">ttl</span><span class="o">=</span>64 <span class="nb">time</span><span class="o">=</span>0.038 ms
64 bytes from 192.168.26.1: <span class="nv">icmp_seq</span><span class="o">=</span>2 <span class="nv">ttl</span><span class="o">=</span>64 <span class="nb">time</span><span class="o">=</span>0.073 ms
64 bytes from 192.168.26.1: <span class="nv">icmp_seq</span><span class="o">=</span>3 <span class="nv">ttl</span><span class="o">=</span>64 <span class="nb">time</span><span class="o">=</span>0.070 ms
</code></pre></div></div>

<p>Excellent! The connection works. Notice that network devices belonging to different namespaces are isolated from each other (try running <code class="language-plaintext highlighter-rouge">ip a</code> in both namespaces to see this separation).</p>

<p>Now we have two separate network stacks that can communicate with each other. However, only the host can access the internet. To provide internet access to our new namespace, we need to configure routing and NAT rules.</p>

<h2 id="enabling-internet-access">Enabling Internet Access</h2>

<p>First, we need to configure the namespace to route all traffic through the host veth interface:</p>

<div class="language-shell highlighter-rouge"><div class="highlight"><pre class="highlight"><code><span class="c"># Set default route in the namespace to use the host veth interface</span>
<span class="nb">sudo </span>ip netns <span class="nb">exec </span>example ip route add default via 192.168.26.1
</code></pre></div></div>

<p>Next, we need to configure the host to forward traffic and perform NAT:</p>

<div class="language-shell highlighter-rouge"><div class="highlight"><pre class="highlight"><code><span class="c"># Enable IP forwarding in the kernel</span>
<span class="nb">sudo </span>sysctl <span class="nt">-w</span> net.ipv4.ip_forward<span class="o">=</span>1

<span class="c"># Allow established connections from internet back to namespace</span>
<span class="nb">sudo </span>iptables <span class="nt">-A</span> FORWARD <span class="nt">-i</span> enp0s1 <span class="nt">-o</span> host-veth <span class="nt">-m</span> state <span class="nt">--state</span> RELATED,ESTABLISHED <span class="nt">-j</span> ACCEPT

<span class="c"># Allow new outgoing connections from namespace to internet</span>
<span class="nb">sudo </span>iptables <span class="nt">-A</span> FORWARD <span class="nt">-i</span> host-veth <span class="nt">-o</span> enp0s1 <span class="nt">-j</span> ACCEPT

<span class="c"># Masquerade (NAT) traffic from the namespace subnet</span>
<span class="nb">sudo </span>iptables <span class="nt">-t</span> nat <span class="nt">-A</span> POSTROUTING <span class="nt">-s</span> 192.168.26.0/24 <span class="nt">-o</span> enp0s1 <span class="nt">-j</span> MASQUERADE
</code></pre></div></div>

<p><strong>Note:</strong> Replace <code class="language-plaintext highlighter-rouge">enp0s1</code> with your actual physical network interface name (find it with <code class="language-plaintext highlighter-rouge">ip route show default</code>).</p>

<p>Now the namespace can reach the internet! Test with <code class="language-plaintext highlighter-rouge">sudo ip netns exec example ping 8.8.8.8</code>:</p>

<div class="language-shell highlighter-rouge"><div class="highlight"><pre class="highlight"><code>PING 8.8.8.8 <span class="o">(</span>8.8.8.8<span class="o">)</span> 56<span class="o">(</span>84<span class="o">)</span> bytes of data.
64 bytes from 8.8.8.8: <span class="nv">icmp_seq</span><span class="o">=</span>1 <span class="nv">ttl</span><span class="o">=</span>117 <span class="nb">time</span><span class="o">=</span>10.2 ms
64 bytes from 8.8.8.8: <span class="nv">icmp_seq</span><span class="o">=</span>2 <span class="nv">ttl</span><span class="o">=</span>117 <span class="nb">time</span><span class="o">=</span>9.66 ms
64 bytes from 8.8.8.8: <span class="nv">icmp_seq</span><span class="o">=</span>3 <span class="nv">ttl</span><span class="o">=</span>117 <span class="nb">time</span><span class="o">=</span>9.31 ms
</code></pre></div></div>

<h2 id="adding-bridge-and-tap-devices-for-vms">Adding Bridge and TAP Devices for VMs</h2>

<p>Now we have established a separate network stack connected to both the host and internet. This is already powerful, but for my use case, I wanted to run all VMs inside this isolated network namespace to avoid polluting the host networking and enable easy cleanup—simply delete the namespace and all virtual interfaces disappear automatically.</p>

<p>To achieve this, we need to make a few adjustments:</p>

<ol>
  <li><strong>Create a bridge</strong> within the namespace</li>
  <li><strong>Remove the IP address</strong> from the namespace veth interface</li>
  <li><strong>Assign the IP address</strong> to the bridge instead</li>
  <li><strong>Set the bridge as master</strong> for the veth interface</li>
  <li><strong>Connect all VM TAP devices</strong> to this bridge</li>
</ol>

<div class="language-shell highlighter-rouge"><div class="highlight"><pre class="highlight"><code><span class="c"># Create a bridge in the namespace</span>
<span class="nb">sudo </span>ip netns <span class="nb">exec </span>example ip <span class="nb">link </span>add name br0 <span class="nb">type </span>bridge

<span class="c"># Remove IP from veth interface and add it to the bridge</span>
<span class="nb">sudo </span>ip netns <span class="nb">exec </span>example ip addr del 192.168.26.2/24 dev example-veth
<span class="nb">sudo </span>ip netns <span class="nb">exec </span>example ip addr add 192.168.26.2/24 dev br0

<span class="c"># Add veth interface to the bridge</span>
<span class="nb">sudo </span>ip netns <span class="nb">exec </span>example ip <span class="nb">link set </span>example-veth master br0

<span class="c"># Bring the bridge up</span>
<span class="nb">sudo </span>ip netns <span class="nb">exec </span>example ip <span class="nb">link set </span>br0 up
</code></pre></div></div>

<p>Now all VM TAP devices created within this namespace will use the bridge as their master, and all VM networking components live in the dedicated namespace. For implementation details, see <a href="https://github.com/q-controller/qcontroller/pull/6">this pull request</a> showing how this was integrated into qcontroller.</p>

<h2 id="bonus-embedded-dhcp-server">Bonus: Embedded DHCP Server</h2>

<p>This networking redesign was partly motivated by the inconvenience of relying on external DHCP servers. Managing a separate DHCP service—starting it independently and configuring interfaces—initially seemed like it would provide flexibility, but in practice proved cumbersome.</p>

<p>I wanted to integrate a DHCP server directly into qcontroller, but faced a significant obstacle: DHCP servers must bind to port <code class="language-plaintext highlighter-rouge">67</code>. If the host system already has a DHCP service running on this port, you cannot start another one in the same network namespace.</p>

<p>Network namespaces solve this elegantly! Since each namespace has its own isolated network stack, including port space, you can run a DHCP server on port <code class="language-plaintext highlighter-rouge">67</code> within the namespace without conflicts. This allows qcontroller to provide integrated DHCP services for VM networking while keeping everything cleanly separated from the host system.</p>

<h2 id="conclusion">Conclusion</h2>

<p>Network namespaces provide an elegant solution for isolating VM networking infrastructure. Key benefits include:</p>

<ul>
  <li><strong>Clean separation</strong> of VM networking from host networking</li>
  <li><strong>Automatic cleanup</strong> when deleting the namespace</li>
  <li><strong>Port isolation</strong> enabling embedded services like DHCP</li>
  <li><strong>Complete control</strong> over routing, firewall rules, and network topology</li>
  <li><strong>Simplified management</strong> through namespace-scoped operations</li>
</ul>

<p>By leveraging network namespaces, we can build more robust and maintainable virtualization solutions that don’t interfere with the host system’s networking configuration.</p>]]></content><author><name>Nikita Vakula</name></author><category term="devops" /><category term="networking" /><category term="virtualization" /><category term="devops" /><category term="infrastructure" /><category term="networking" /><category term="namespaces" /><category term="linux" /><summary type="html"><![CDATA[In my previous articles, I discussed various networking approaches for Linux virtualization. I developed qcontroller, a tool responsible for managing the complete lifecycle of QEMU VM instances—creating, starting, stopping, and removing VMs with database-like operations.]]></summary></entry><entry><title type="html">Running QEMU VMs on ARM64: UEFI Requirements</title><link href="https://krjakbrjak.github.io/devops/virtualization/arm64/2025/10/05/Running-QEMU-VMs-on-ARM64-UEFI-Requirements.html" rel="alternate" type="text/html" title="Running QEMU VMs on ARM64: UEFI Requirements" /><published>2025-10-05T00:00:00+00:00</published><updated>2025-10-05T00:00:00+00:00</updated><id>https://krjakbrjak.github.io/devops/virtualization/arm64/2025/10/05/Running%20QEMU%20VMs%20on%20ARM64:%20UEFI%20Requirements</id><content type="html" xml:base="https://krjakbrjak.github.io/devops/virtualization/arm64/2025/10/05/Running-QEMU-VMs-on-ARM64-UEFI-Requirements.html"><![CDATA[<p>In my previous notes, I’ve discussed how <a href="https://www.qemu.org/">QEMU</a> serves as a versatile and flexible tool for creating and managing virtual machines. One of QEMU’s greatest strengths is its support for a wide range of platforms, making it an ideal choice for cross-platform development and testing. However, this versatility requires us to understand the subtle differences between architectures when configuring our VMs.</p>

<p>In this article, I’ll explain why the QEMU commands that work for x86_64 platforms require specific adjustments when running ARM64 VMs, with a particular focus on the UEFI firmware requirements that are essential for ARM64 virtualization.</p>

<h2 id="understanding-the-difference-arm64-vs-x86_64-booting">Understanding the Difference: ARM64 vs x86_64 Booting</h2>

<p>When working with ARM64 architecture, there’s a fundamental difference in how the system boots compared to traditional x86_64 systems. While ARM64 can utilize different boot methods including U-Boot for embedded systems, UEFI (Unified Extensible Firmware Interface) is the default and preferred method for server and cloud environments. As documented in the <a href="https://documentation.ubuntu.com/server/how-to/virtualisation/qemu/index.html">Ubuntu server virtualization guide</a>, Ubuntu ARM64 cloud images specifically rely on UEFI for hardware initialization and kernel loading.</p>

<p>Unlike x86_64, which can boot using legacy BIOS or UEFI without additional configuration in QEMU, ARM64 cloud images typically require explicitly configured UEFI firmware. When using QEMU for ARM64 virtualization with cloud images like Ubuntu, we must explicitly provide:</p>

<ol>
  <li>
    <p><strong>UEFI Firmware (.fd) file</strong>: These files contain the actual UEFI firmware code, which includes drivers, bootloaders, and the pre-boot environment for the system. Think of this as the replacement for traditional BIOS.</p>
  </li>
  <li>
    <p><strong>UEFI Variables (.vars) file</strong>: These store data in the system’s non-volatile RAM (NVRAM) that control the UEFI environment. This includes critical information such as the default boot entry, boot order, and secure boot settings.</p>
  </li>
</ol>

<h2 id="finding-available-firmware-files">Finding Available Firmware Files</h2>

<p>Fortunately, when you install QEMU, it automatically includes supported firmware files for various architectures. To locate the firmware files available in your QEMU installation, run:</p>

<div class="language-shell highlighter-rouge"><div class="highlight"><pre class="highlight"><code>qemu-system-aarch64 <span class="nt">-L</span> <span class="nb">help</span>
</code></pre></div></div>

<p>This command will display output similar to:</p>

<div class="language-shell highlighter-rouge"><div class="highlight"><pre class="highlight"><code>/opt/homebrew/Cellar/qemu/10.1.0/bin/../share/qemu-firmware
/opt/homebrew/Cellar/qemu/10.1.0/bin/../share/qemu
</code></pre></div></div>

<p>These directories contain both firmware and UEFI variable files for different architectures. For ARM64 (aarch64) with the “virt” machine type, the suitable firmware is typically <code class="language-plaintext highlighter-rouge">edk2-aarch64-code.fd</code>.</p>

<h2 id="properly-configuring-arm64-vms">Properly Configuring ARM64 VMs</h2>

<p>To run an ARM64 VM, we need to adjust our QEMU command from what we might use for x86_64. Here’s a proper example for running an Ubuntu ARM64 cloud image:</p>

<div class="language-shell highlighter-rouge"><div class="highlight"><pre class="highlight"><code>qemu-system-aarch64 <span class="se">\</span>
  <span class="nt">-machine</span> virt <span class="nt">-accel</span> hvf <span class="nt">-m</span> 2048 <span class="se">\</span>
  <span class="nt">-nographic</span> <span class="nt">-hda</span> ./ubuntu-25.04-server-cloudimg-amd64.img <span class="se">\</span>
  <span class="nt">-smbios</span> <span class="nb">type</span><span class="o">=</span>1,serial<span class="o">=</span><span class="nv">ds</span><span class="o">=</span><span class="s1">'nocloud;s=http://192.168.178.37:8000/'</span>
  <span class="nt">-bios</span> edk2-aarch64-code.fd
</code></pre></div></div>

<p>Let’s break down the new elements that are specific to ARM64:</p>

<ul>
  <li><code class="language-plaintext highlighter-rouge">-machine virt</code>: We use the “virt” machine type instead of “q35” (which is for x86_64)</li>
  <li><code class="language-plaintext highlighter-rouge">-bios</code>: option to specify firmware</li>
</ul>

<p>The <code class="language-plaintext highlighter-rouge">bios</code> parameter is critical here as it tells QEMU to use UEFI firmware.</p>

<h2 id="conclusion">Conclusion</h2>

<p>Running ARM64 VMs with QEMU requires understanding the essential role that UEFI plays in the boot process. By correctly specifying the firmware, you can successfully run ARM64 virtual machines even on different host architectures.</p>

<h2 id="useful-links">Useful links</h2>
<ul>
  <li><a href="https://wiki.freebsd.org/arm64/QEMU">FreeBSD on QEMU ARM64</a></li>
  <li><a href="https://documentation.ubuntu.com/server/how-to/virtualisation/qemu/index.html">Virtualisation with QEMU</a></li>
</ul>]]></content><author><name>Nikita Vakula</name></author><category term="devops" /><category term="virtualization" /><category term="arm64" /><category term="devops" /><category term="infrastructure" /><category term="qemu" /><category term="uefi" /><summary type="html"><![CDATA[In my previous notes, I’ve discussed how QEMU serves as a versatile and flexible tool for creating and managing virtual machines. One of QEMU’s greatest strengths is its support for a wide range of platforms, making it an ideal choice for cross-platform development and testing. However, this versatility requires us to understand the subtle differences between architectures when configuring our VMs.]]></summary></entry><entry><title type="html">Local DNS Resolution for Docker Containers in Development</title><link href="https://krjakbrjak.github.io/devops/containers/networking/2025/09/07/Local-DNS-Resolution-for-Docker-Containers-in-Development.html" rel="alternate" type="text/html" title="Local DNS Resolution for Docker Containers in Development" /><published>2025-09-07T00:00:00+00:00</published><updated>2025-09-07T00:00:00+00:00</updated><id>https://krjakbrjak.github.io/devops/containers/networking/2025/09/07/Local%20DNS%20Resolution%20for%20Docker%20Containers%20in%20Development</id><content type="html" xml:base="https://krjakbrjak.github.io/devops/containers/networking/2025/09/07/Local-DNS-Resolution-for-Docker-Containers-in-Development.html"><![CDATA[<h2 id="the-challenge-service-discovery-in-containers">The challenge: service discovery in containers</h2>

<p>In modern backend development, most systems run in isolated environments—most commonly, containers. A typical backend consists of several services that need to communicate with each other. Orchestrators like Kubernetes and Docker Compose provide internal DNS so services can reach each other by hostname. It’s convenient and often feels like magic.</p>

<h2 id="why-internal-dns-isnt-enough-the-public-url-problem">Why internal DNS isn’t enough (the “public URL” problem)</h2>

<p>What if you need to access your service via a public URL? Imagine a reverse proxy fronting everything, with Keycloak behind it and an oauth2-proxy handling authentication via Keycloak. oauth2-proxy needs:</p>

<ol>
  <li><code class="language-plaintext highlighter-rouge">--redirect-url</code> — the URL the browser hits</li>
  <li><code class="language-plaintext highlighter-rouge">--oidc-issuer-url</code> — the URL the proxy uses to obtain tokens</li>
</ol>

<p>To avoid CSRF issues you also set <code class="language-plaintext highlighter-rouge">--cookie-secure=true</code>. Because clients reach Keycloak <strong>through</strong> the reverse proxy, the redirect URL must point to the proxy; the issuer URL should also point to Keycloak. You <strong>could</strong> use an internal DNS name for the issuer URL, but that breaks CSRF checks—<strong>both URLs must share the same hostname</strong>, which is typically a public domain you don’t have in local dev. Dilemma.</p>

<h2 id="why-mismatched-hostnames-trigger-csrf-errors">Why mismatched hostnames trigger “CSRF” errors</h2>

<p>During the OAuth/OIDC flow your proxy sets a short-lived value (state/nonce) in a cookie on the exact host the user is visiting (e.g. <code class="language-plaintext highlighter-rouge">auth.local.test</code>). When Keycloak redirects back, the proxy must compare the state in the callback URL with the copy stored in that cookie. That comparison is the CSRF defence.
If you mix hosts—say the browser hits <code class="language-plaintext highlighter-rouge">https://auth.local.test</code> but your issuer is <code class="language-plaintext highlighter-rouge">http://keycloak:8080</code>—the browser won’t send the cookie to the other host. Different host =&gt; different cookie scope. On top of that, <code class="language-plaintext highlighter-rouge">--cookie-secure=true</code> means the cookie is only sent over HTTPS, so any HTTP hop drops it. Modern SameSite rules also treat different hosts as “cross-site”, which further blocks the cookie from riding along. The proxy can’t find the cookie it set, the state check fails, and you get a CSRF error.</p>

<p>This is why resolving the “public” name to your container locally is so effective: every step sees the same host, so the browser sends the right cookie and the CSRF check passes.</p>

<h2 id="existing-solutions">Existing Solutions</h2>

<p>At this point, you either fake domains in <code class="language-plaintext highlighter-rouge">/etc/hosts</code> or look for a tool that maps container names to hostnames. I started with the smart <a href="https://github.com/ruudud/devdns">devdns</a> project and even <a href="https://github.com/krjakbrjak/name_resolver/tree/f92d96ada706d4d760693dc8adfb0f4f9656f0ec">tried automating</a> hosts-file updates on Docker start/stop. It worked, but hosts files are brittle and easily clobbered. I wanted something that behaves like real DNS without hand-editing files.</p>

<h2 id="a-better-approach-local-dns-server-for-containers">A Better Approach: Local DNS Server for Containers</h2>

<p>Run a local DNS server that watches running containers. If a query matches a container’s name (or alias), answer with the container’s IP. Otherwise, forward to your normal upstreams (Google, Cloudflare, etc.). Docker’s APIs are great in Go, and <a href="https://github.com/miekg/dns">miekg/dns</a> makes DNS straightforward, so I built a tiny server in Go. You can find the code <a href="https://github.com/krjakbrjak/name_resolver">here</a>.</p>

<h3 id="how-it-works-at-a-glance">How it works (at a glance)</h3>
<ul>
  <li>Browser asks DNS for <strong>example.com</strong>.</li>
  <li>Local resolver checks if a container named/aliased <strong>example.com</strong> is running.</li>
  <li>If yes → return the container’s IP. If no → forward to public DNS and return that IP.</li>
</ul>

<p align="center">
  <img src="/images/posts/Local DNS Resolution for Docker Containers in Development/flow.svg" alt="Local DNS Container Name Resolution Flow" />
</p>

<h2 id="how-to-use-the-local-dns-server">How to Use the Local DNS Server</h2>
<p>When you run the DNS server locally (for example, on port <code class="language-plaintext highlighter-rouge">53</code>), it will resolve container names to their IP addresses automatically. Here’s a simple example using Docker Compose:</p>

<div class="language-yaml highlighter-rouge"><div class="highlight"><pre class="highlight"><code><span class="na">services</span><span class="pi">:</span>
  <span class="na">ubuntu</span><span class="pi">:</span>
    <span class="na">image</span><span class="pi">:</span> <span class="s">ubuntu:latest</span>
    <span class="na">container_name</span><span class="pi">:</span> <span class="s">github.com</span>
    <span class="na">command</span><span class="pi">:</span> <span class="pi">[</span><span class="s2">"</span><span class="s">sleep"</span><span class="pi">,</span> <span class="s2">"</span><span class="s">infinity"</span><span class="pi">]</span>
</code></pre></div></div>

<p>After starting this Compose file, any DNS query for <code class="language-plaintext highlighter-rouge">github.com</code> will resolve to the IP address of the <code class="language-plaintext highlighter-rouge">ubuntu</code> container. For instance, running <code class="language-plaintext highlighter-rouge">dig github.com</code> will return:</p>

<div class="language-shell highlighter-rouge"><div class="highlight"><pre class="highlight"><code><span class="p">;</span> &lt;&lt;<span class="o">&gt;&gt;</span> DiG 9.20.4-3ubuntu1.2-Ubuntu &lt;&lt;<span class="o">&gt;&gt;</span> github.com
<span class="p">;;</span> global options: +cmd
<span class="p">;;</span> Got answer:
<span class="p">;;</span> -&gt;&gt;HEADER<span class="o">&lt;&lt;-</span> <span class="no">opcode</span><span class="sh">: QUERY, status: NOERROR, id: 44158
;; flags: qr rd ra; QUERY: 1, ANSWER: 1, AUTHORITY: 0, ADDITIONAL: 1

;; OPT PSEUDOSECTION:
; EDNS: version: 0, flags:; udp: 65494
;; QUESTION SECTION:
;github.com.                    IN      A

;; ANSWER SECTION:
github.com.             0       IN      A       172.21.0.2

;; Query time: 2 msec
;; SERVER: 127.0.0.53#53(127.0.0.53) (UDP)
;; WHEN: Sun Sep 07 19:24:24 CEST 2025
;; MSG SIZE  rcvd: 55
</span></code></pre></div></div>

<p>Notice that the IP address in the answer section matches the container’s IP. You can verify this with:</p>

<div class="language-shell highlighter-rouge"><div class="highlight"><pre class="highlight"><code>docker compose <span class="nt">-f</span> /tmp/docker-compose.yml ps <span class="nt">-q</span> ubuntu | xargs docker inspect <span class="nt">-f</span> <span class="s1">'{{range .NetworkSettings.Networks}}{{.IPAddress}}{{end}}'</span>
172.21.0.2
</code></pre></div></div>

<h2 id="configuring-your-system-to-use-the-dns-server">Configuring Your System to Use the DNS Server</h2>

<blockquote>
  <p>Note: To use this DNS server, configure your system to point to it. For example, if using <code class="language-plaintext highlighter-rouge">systemd-resolved</code>:</p>
  <div class="language-shell highlighter-rouge"><div class="highlight"><pre class="highlight"><code><span class="nb">sudo </span>resolvectl dns &lt;INTERFACE&gt; 127.0.0.1:5300
</code></pre></div>  </div>
  <p>This change is temporary and will reset on reboot. To revert manually:</p>
  <div class="language-shell highlighter-rouge"><div class="highlight"><pre class="highlight"><code><span class="nb">sudo </span>systemctl restart systemd-resolved
</code></pre></div>  </div>
</blockquote>

<h2 id="conclusion">Conclusion</h2>

<p>Local dev often breaks when parts of your stack see different hostnames. A tiny local DNS server fixes that: resolve container names to their IPs, forward everything else upstream, and your dev environment starts behaving like production without hacks.</p>

<h3 id="why-this-helps-you">Why this helps you</h3>

<ul>
  <li>One hostname end-to-end → fewer auth/cookie surprises.</li>
  <li>No manual hosts edits</li>
  <li>Works with Compose out of the box; trivial to verify with dig.</li>
</ul>]]></content><author><name>Nikita Vakula</name></author><category term="devops" /><category term="containers" /><category term="networking" /><category term="go" /><category term="devops" /><category term="infrastructure" /><category term="dns" /><category term="docker" /><summary type="html"><![CDATA[The challenge: service discovery in containers]]></summary></entry></feed>